解决 GitHub Connect: kex_exchange_identification: Connection closed by remote host 作者: Shine 时间: 2022-07-30 分类: Linux 评论 # 背景 想要克隆项目/推送代码到 GitHub 老实错误,检查发现: ```shell ➜ ~ ssh -vvv git@github.com OpenSSH_8.1p1, LibreSSL 2.7.3 debug1: Reading configuration data /Users/chuwen/.ssh/config debug1: /Users/chuwen/.ssh/config line 1: Applying options for * debug1: /Users/chuwen/.ssh/config line 6: Applying options for github.com debug1: Reading configuration data /etc/ssh/ssh_config debug1: /etc/ssh/ssh_config line 47: Applying options for * debug1: Executing proxy command: exec nc -v -x 127.0.0.1:7890 github.com 443 debug1: identity file /Users/chuwen/.ssh/id_rsa type 0 debug1: identity file /Users/chuwen/.ssh/id_rsa-cert type -1 debug1: identity file /Users/chuwen/.ssh/id_dsa type -1 debug1: identity file /Users/chuwen/.ssh/id_dsa-cert type -1 debug1: identity file /Users/chuwen/.ssh/id_ecdsa type -1 debug1: identity file /Users/chuwen/.ssh/id_ecdsa-cert type -1 debug1: identity file /Users/chuwen/.ssh/id_ed25519 type -1 debug1: identity file /Users/chuwen/.ssh/id_ed25519-cert type -1 debug1: identity file /Users/chuwen/.ssh/id_xmss type -1 debug1: identity file /Users/chuwen/.ssh/id_xmss-cert type -1 debug1: Local version string SSH-2.0-OpenSSH_8.1 Connection to github.com port 443 [tcp/https] succeeded! kex_exchange_identification: Connection closed by remote host ``` # 解决方案 最后找到[一篇文章](https://idreamshen.github.io/posts/github-connection-closed/ "一篇文章")解决了这个问题。 只需要在 `~/.ssh/config` 配置以下项目即可 ```config Host github.com HostName ssh.github.com User git Port 443 ``` 如果想要配置代理可以这样: ```config Host github.com HostName ssh.github.com User git Port 443 # 走 HTTP 代理 # ProxyCommand socat - PROXY:127.0.0.1:%h:%p,proxyport=8080 # 走 socks5 代理(如 Shadowsocks) ProxyCommand nc -v -x 127.0.0.1:7890 %h %p ``` ## 最终解决了问题 ```shell ➜ ~ ssh -T git@github.com Connection to ssh.github.com port 443 [tcp/https] succeeded! Hi PrintNow/react-i18next-base-usage! You've successfully authenticated, but GitHub does not provide shell access ```
Linux 命令对文件夹权限改为 755,文件权限改为 644 作者: Shine 时间: 2021-12-29 分类: Linux技巧 评论 ```shell # 改用户组 chown www:www -R /www/wwwroot/chuwen/ # 将所有文件(夹)权限改为 644 chmod 644 -R /www/wwwroot/chuwen/ # 将文件夹改为 755 权限 find /www/wwwroot/chuwen/ -type d -print|xargs chmod 755 ```
Nginx 报错: nginx: [emerg] open() "/etc/nginx/fastcgi.conf" failed (2: No such file or directory) 作者: Shine 时间: 2021-12-28 分类: Linux 评论 nginx: [emerg] open() "/etc/nginx/fastcgi.conf" failed (2: No such file or directory) 出错的相关配置: ``` location ~ .*\.php(\/.*)*$ { fastcgi_pass app_server:9000; include fastcgi.conf; fastcgi_connect_timeout 10; fastcgi_send_timeout 10; fastcgi_read_timeout 10; } ``` 只需要把 `include fastcgi.conf;` 改成 `include fastcgi_params;` 即可 ``` location ~ .*\.php(\/.*)*$ { fastcgi_pass app_server:9000; include fastcgi_params; fastcgi_connect_timeout 10; fastcgi_send_timeout 10; fastcgi_read_timeout 10; } ```
Linux 搭建网关服务器,使内网服务器访问公网 作者: Shine 时间: 2021-12-26 分类: Linux 评论 有这么一个需求: - 其中 1 台主机,可以访问公网 - 其它 2 台主机,不能访问公网,但是这几台主机处于同一个局域网可以相互访问 大概就是如下图的拓扑图  想要实现的就是,主机 2、主机 3 能够通过**主机 1**访问到公网 ## 首先在可以访问公网的服务器上配置网关服务器 - 系统:`CentOS Linux release 8.3.2011` - 局域网网段:`192.168.58.0/24` - 本机局域网 IP:`192.168.58.3` ```shell # step 1:关闭并永久禁用firewalld服务 systemctl stop firewalld systemctl disable firewalld # step 2:安装iptables-services yum -y install iptables-services # step 3:开启内核转发 vim /etc/sysctl.conf #添加一条规则 net.ipv4.ip_forward = 1 sysctl -p #使之生效 # step 4:配置iptables转发规则,主要下这个网段要改为你的局域网网段 iptables -t nat -A POSTROUTING -s 192.168.58.0/24 -j MASQUERADE #step 5:保存iptables规则 service iptables save #如果不执行save,重启失效 ``` ## 配置其它不能访问公网的服务器的网关地址 - 假设网卡是:`eth0` 1. 查看本机器的 IP 地址 `ip addr`,如图所示,这台机器的局域网 IP 是 `192.168.58.4` 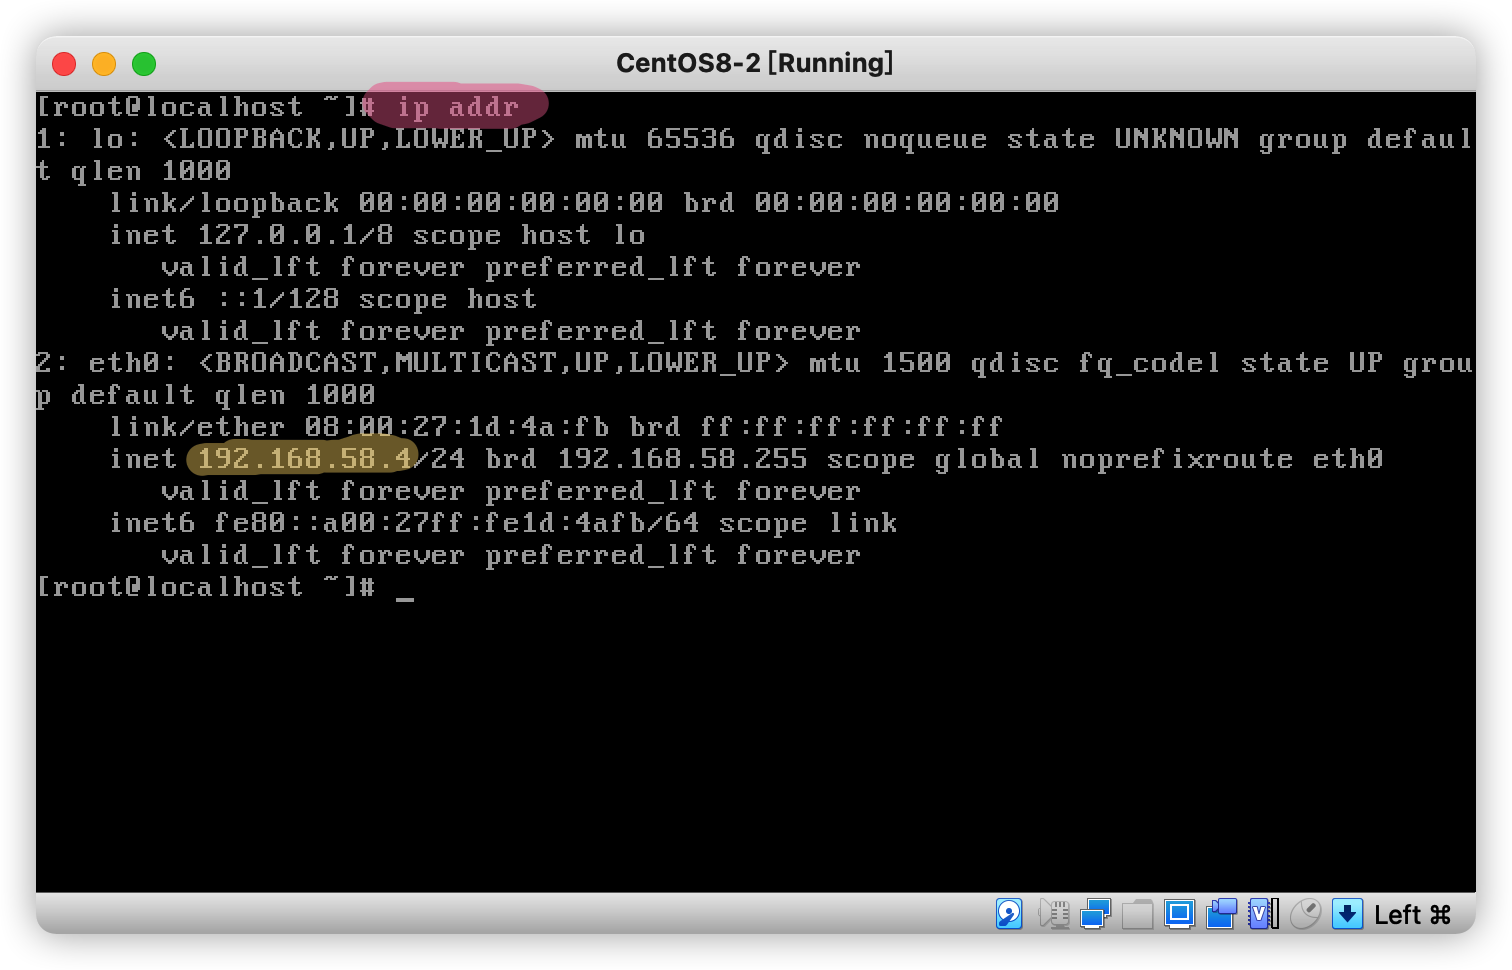 2. 修改网卡的网关地址 `vi /etc/sysconfig/network-scripts/ifcfg-eth0` 未修改前是长这样的: 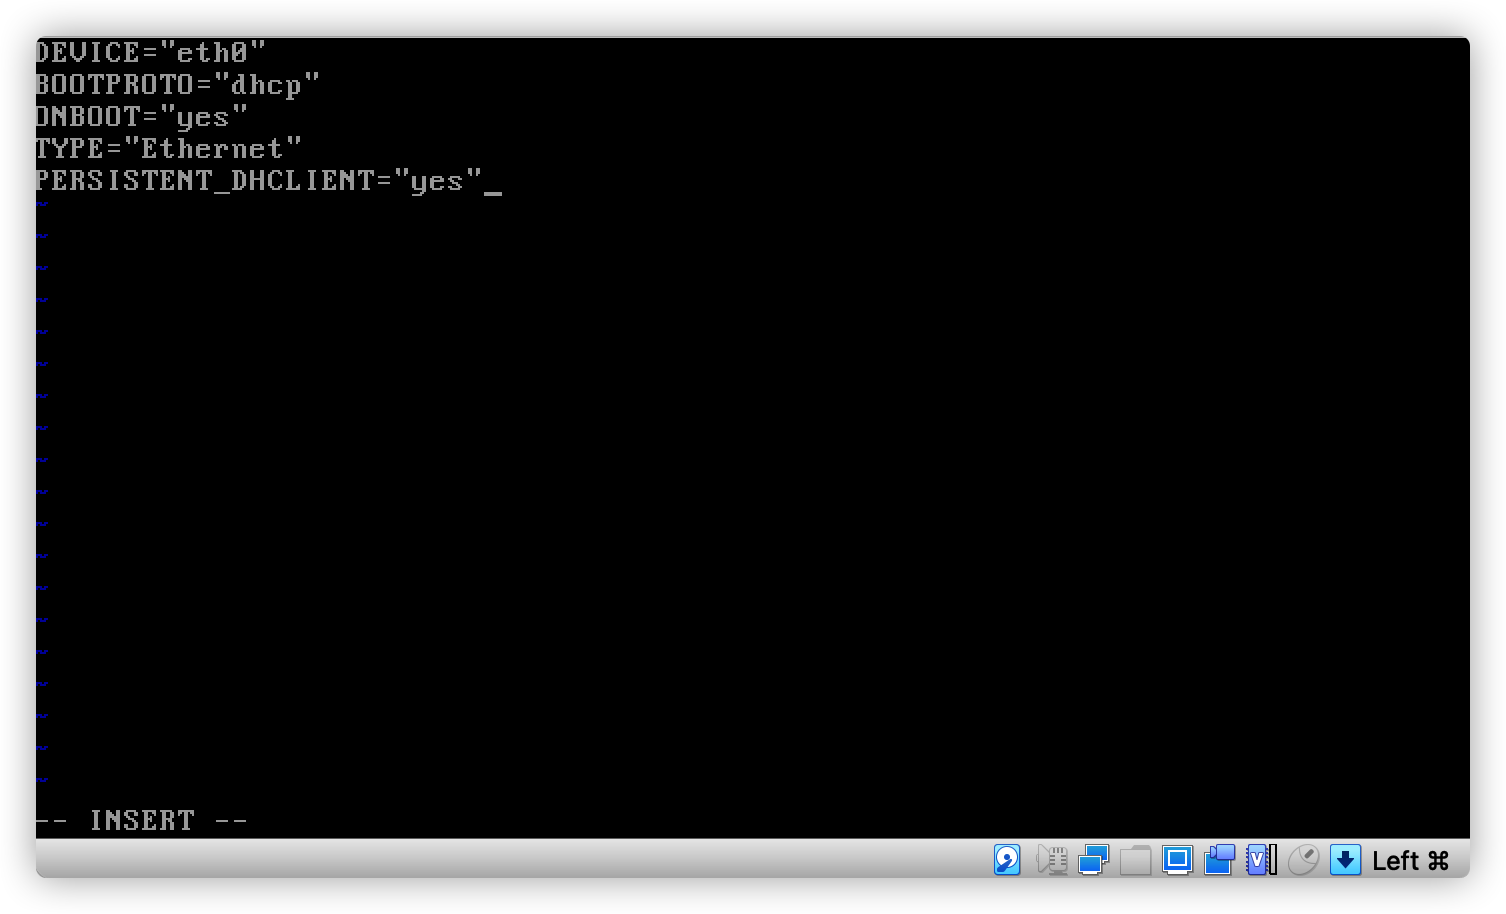 我们需要改成这样 ``` BOOTPROTO="static" IPADDR="192.168.58.4" PREFIX="24" # 请注意这里是网关地址 GATEWAY="192.168.58.3" # DNS 服务器改成能服务的就行(也就是说内网/公网 IP DNS 服务器都可以) DNS1="223.5.5.5" ``` 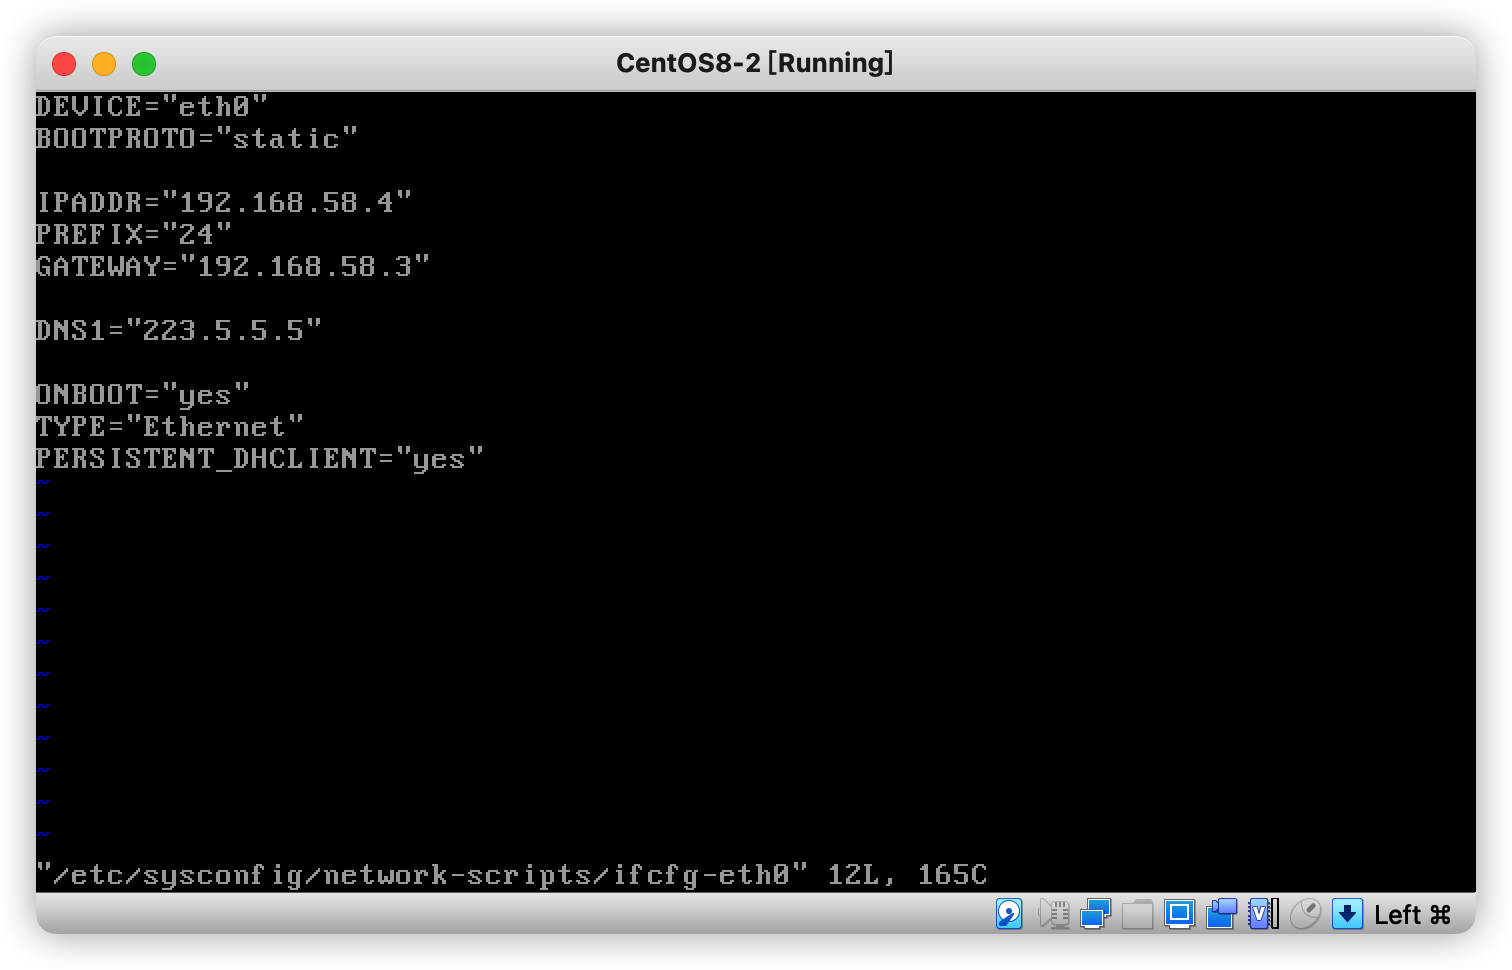 3.然后重启即可生效 ## 测试访问 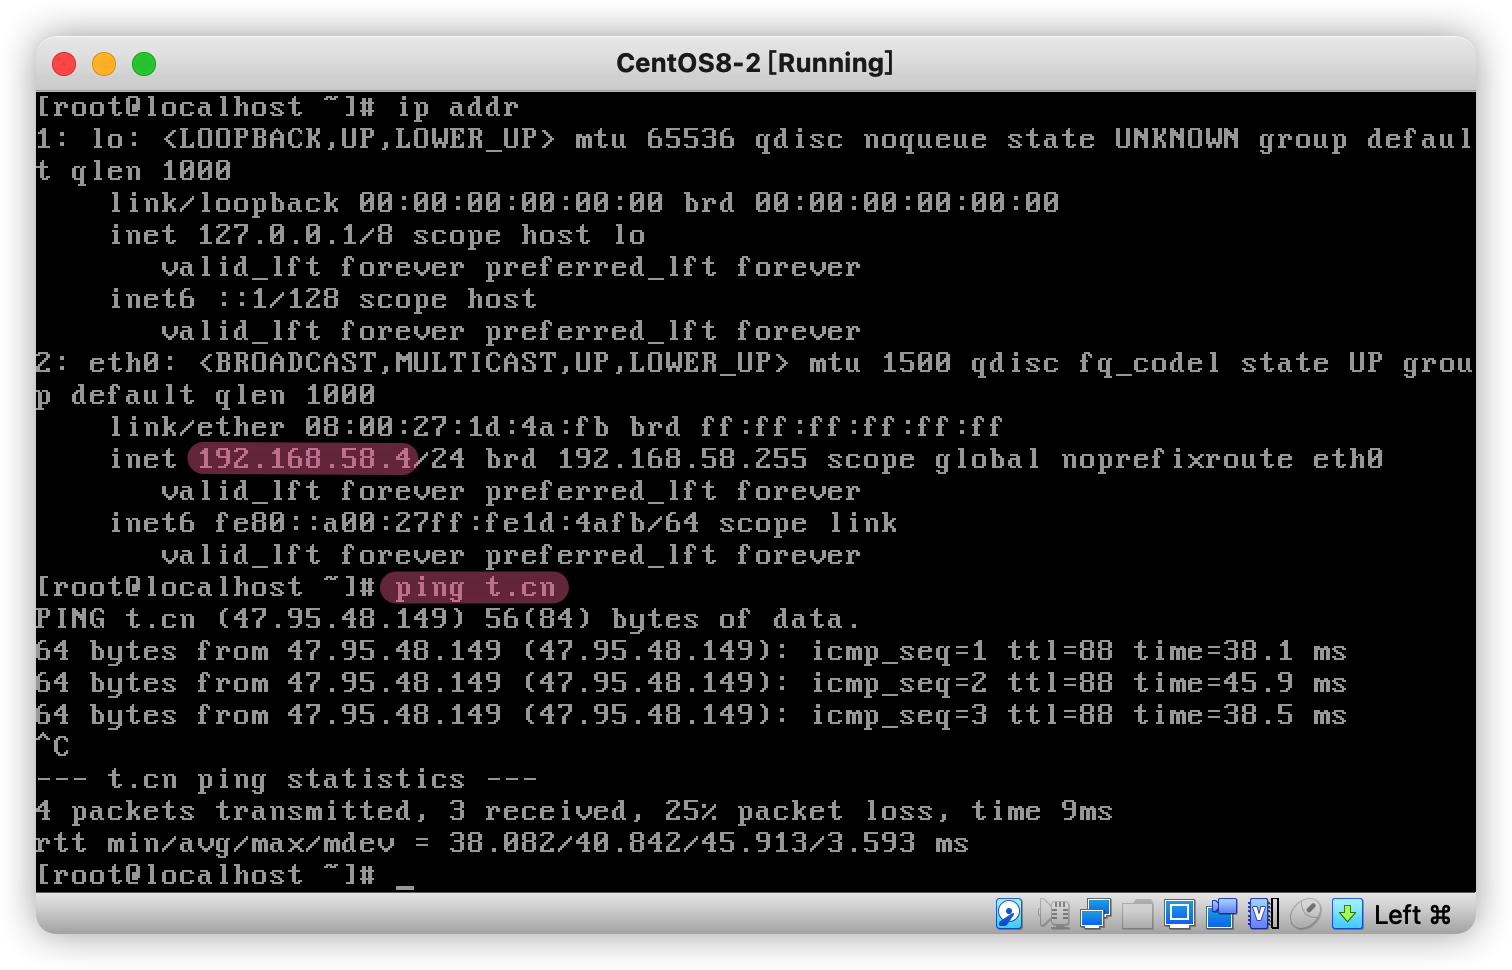 ---- 参考文章:https://blog.51cto.com/u_11451275/3225436
VirtualBox 使多个虚拟机处在同一个局域网 作者: Shine 时间: 2021-12-26 分类: VirtualBox 评论 这里以 macOS 下举例子了,Windows 平台找到类似的菜单设置即可 1. 打开:管理 -> 主机网络管理器 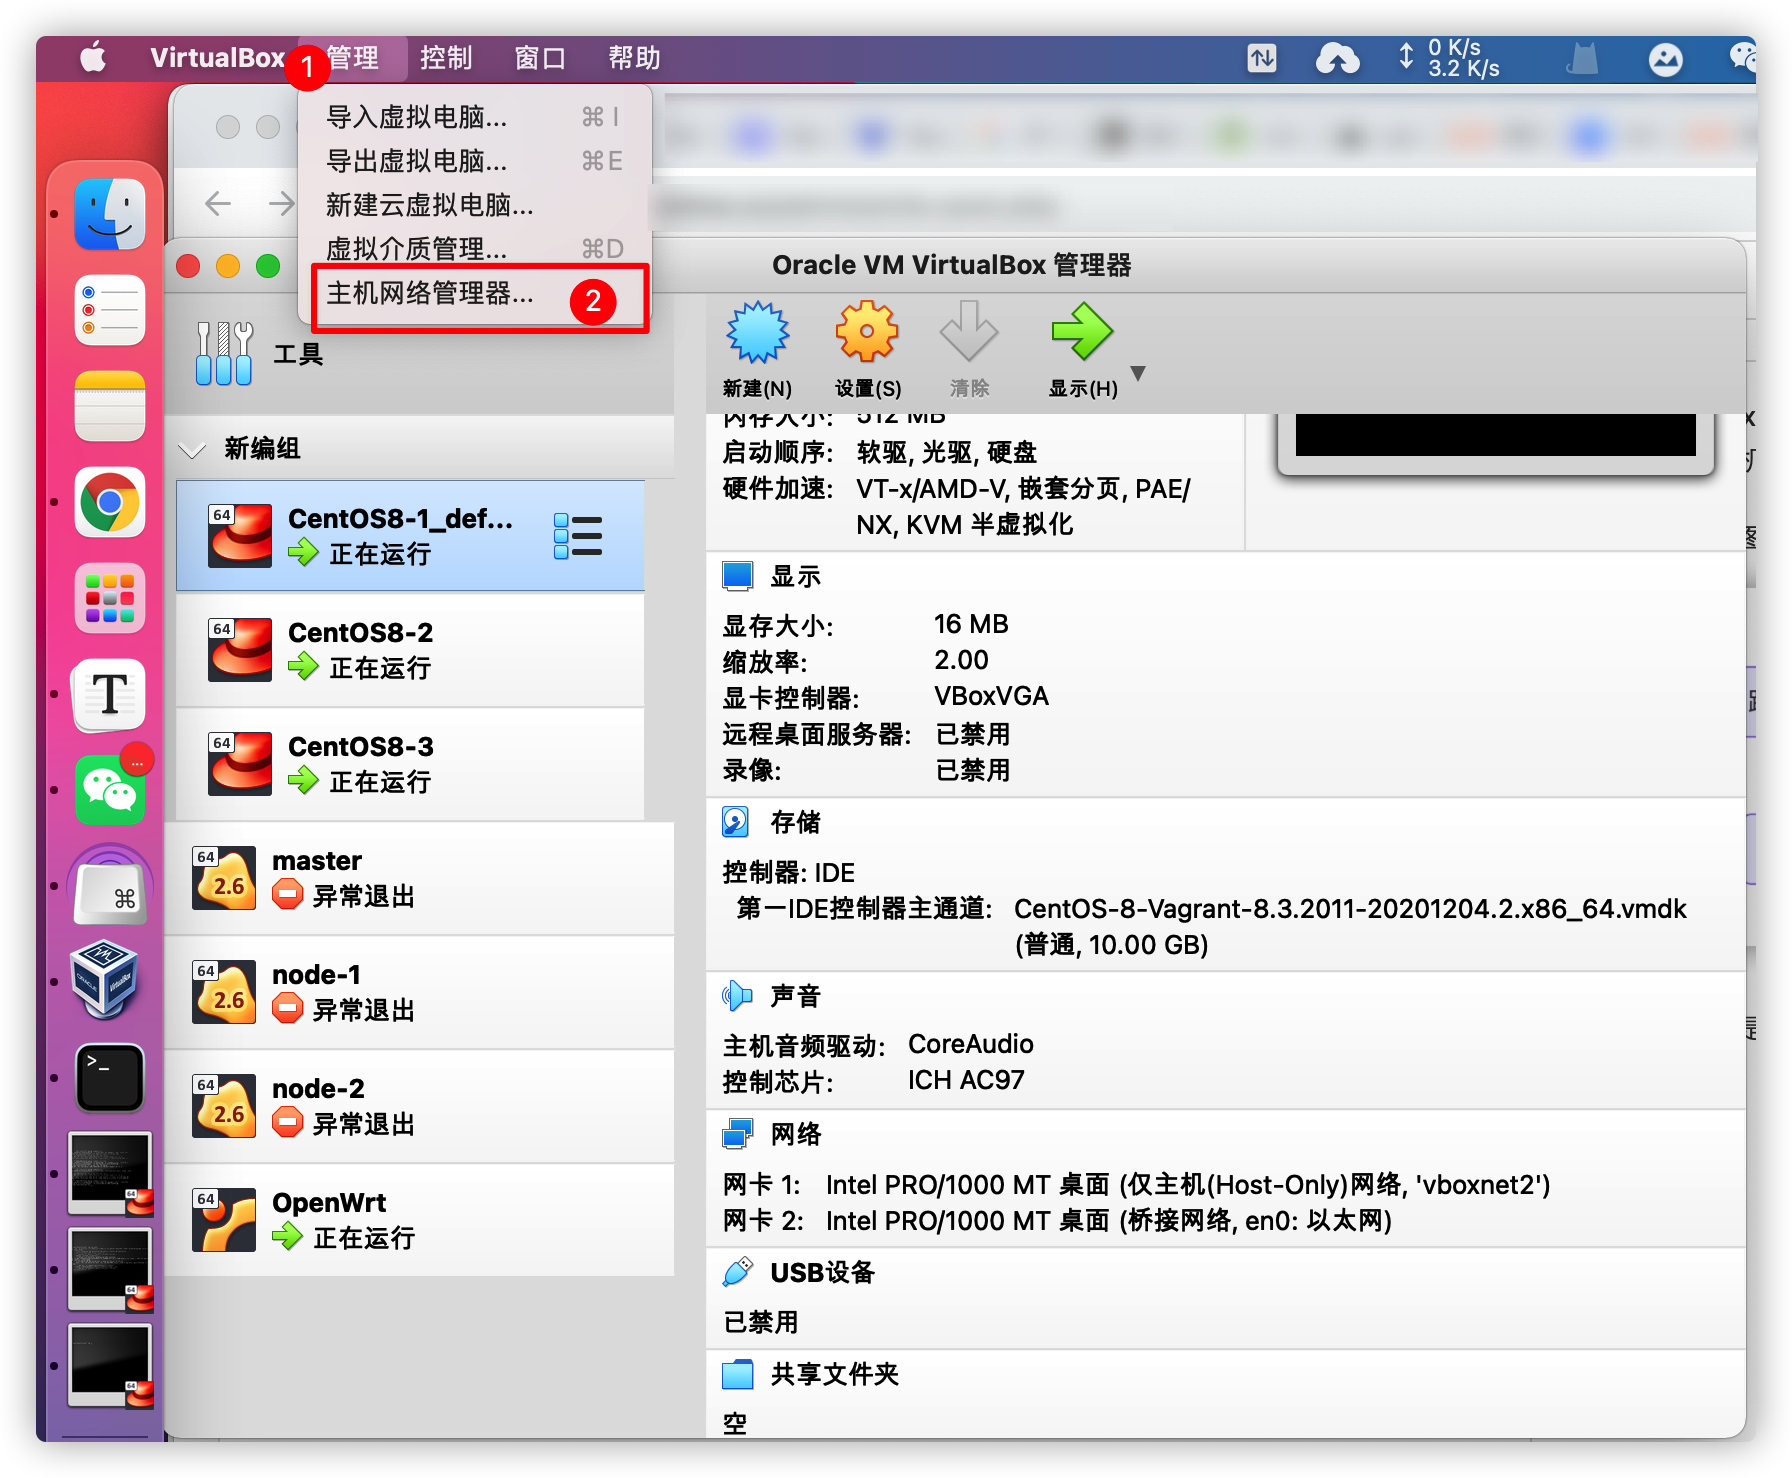 2. 然后创建  3. 假设我们创建得到的是 **vboxnet2**,然后按照图中进行配置,配置完成后点击 应用 即可 > 需要启用 DHCP 服务器,不然主机没办法自动获取到 IP 地址 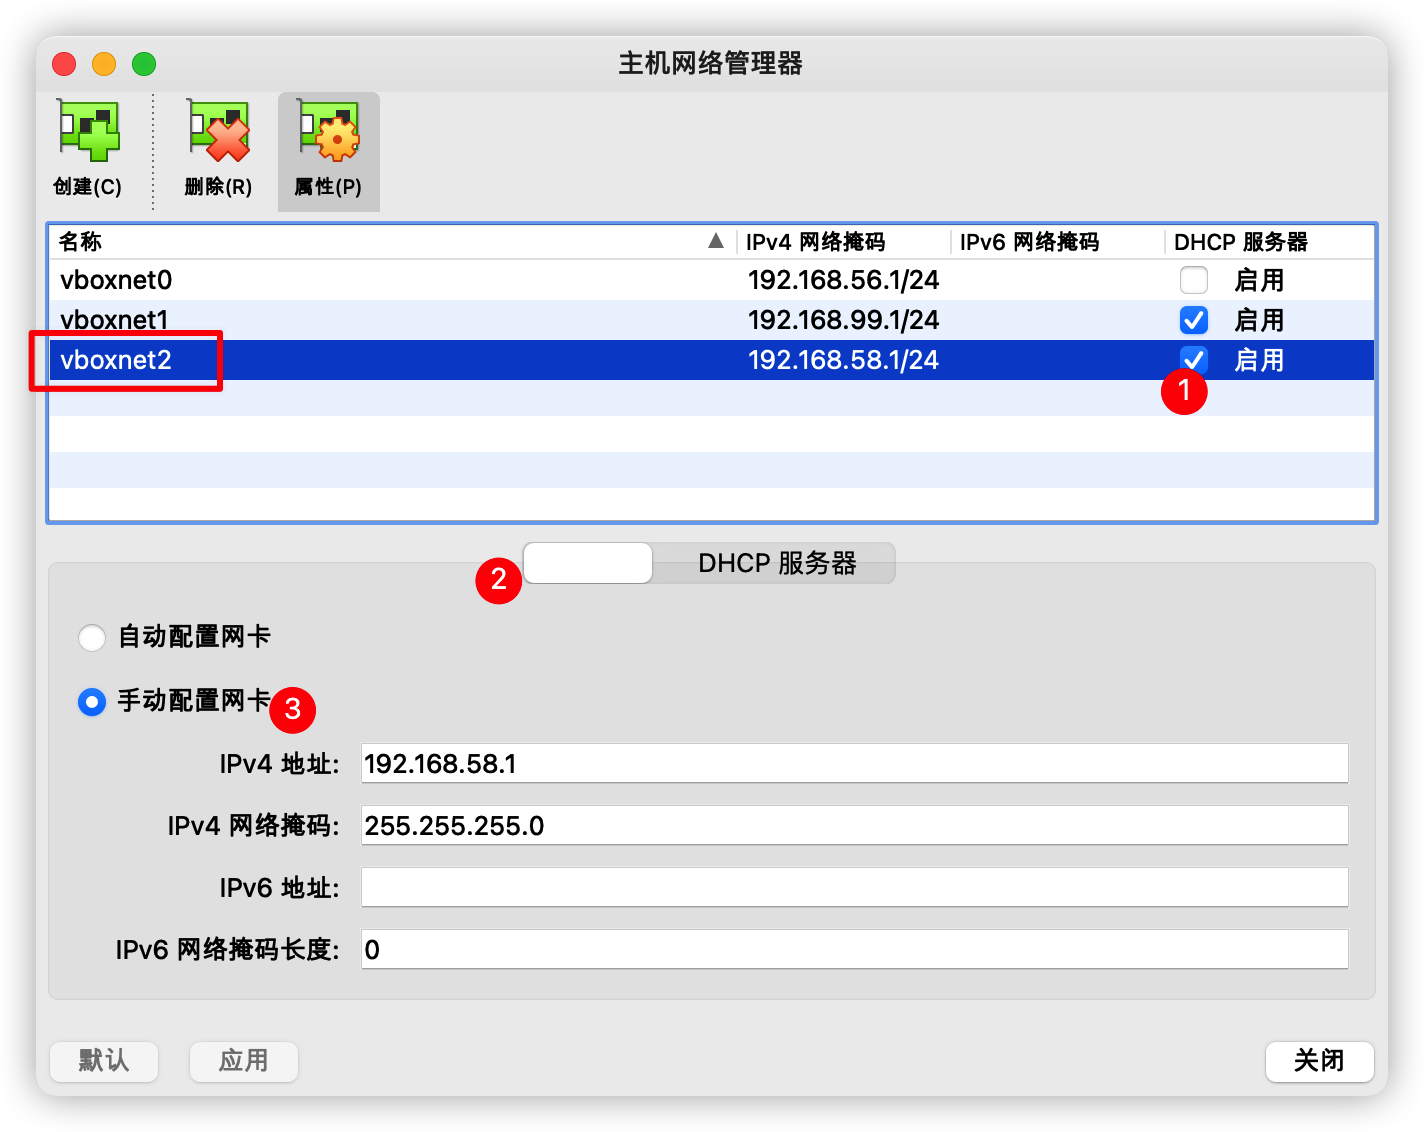 4. 选择一个你创建的虚拟机,然后点击设置 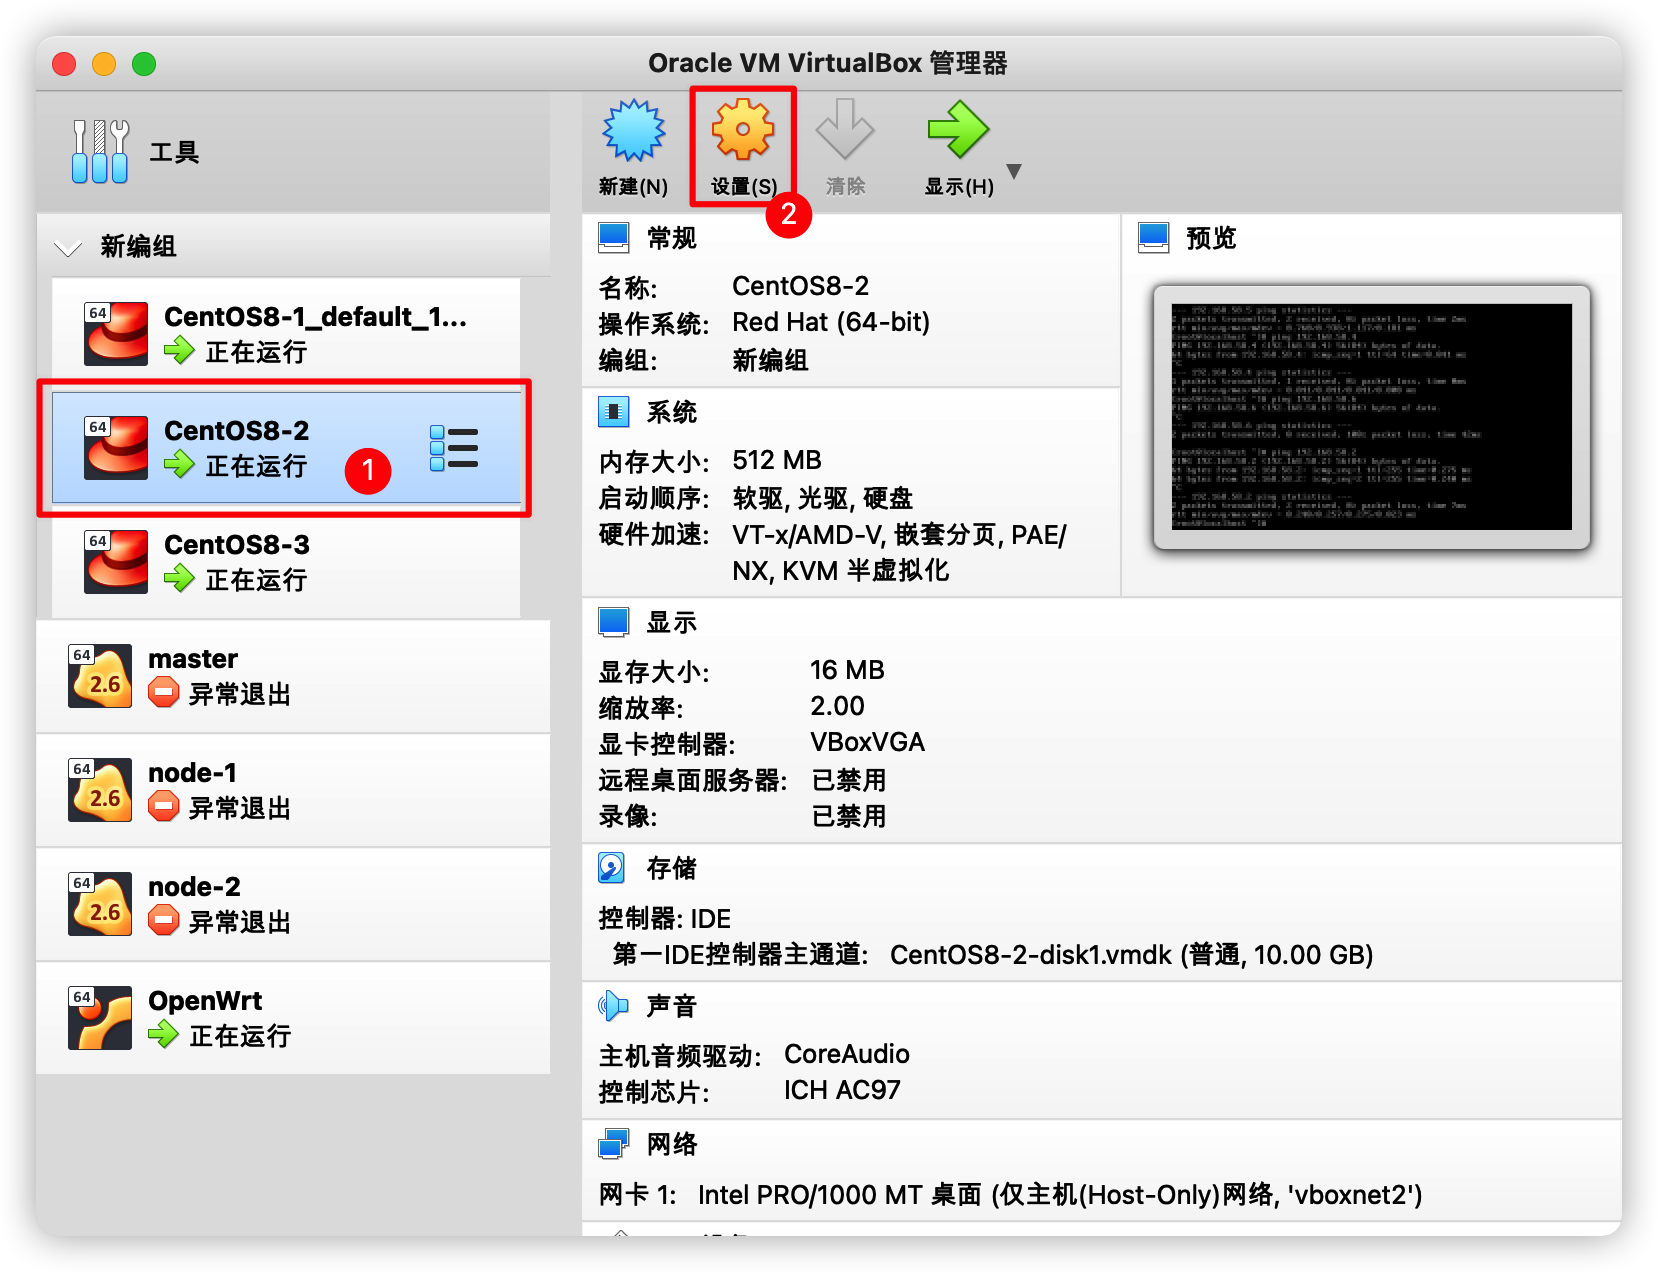 5. 配置网络,然后点击 OK 保存 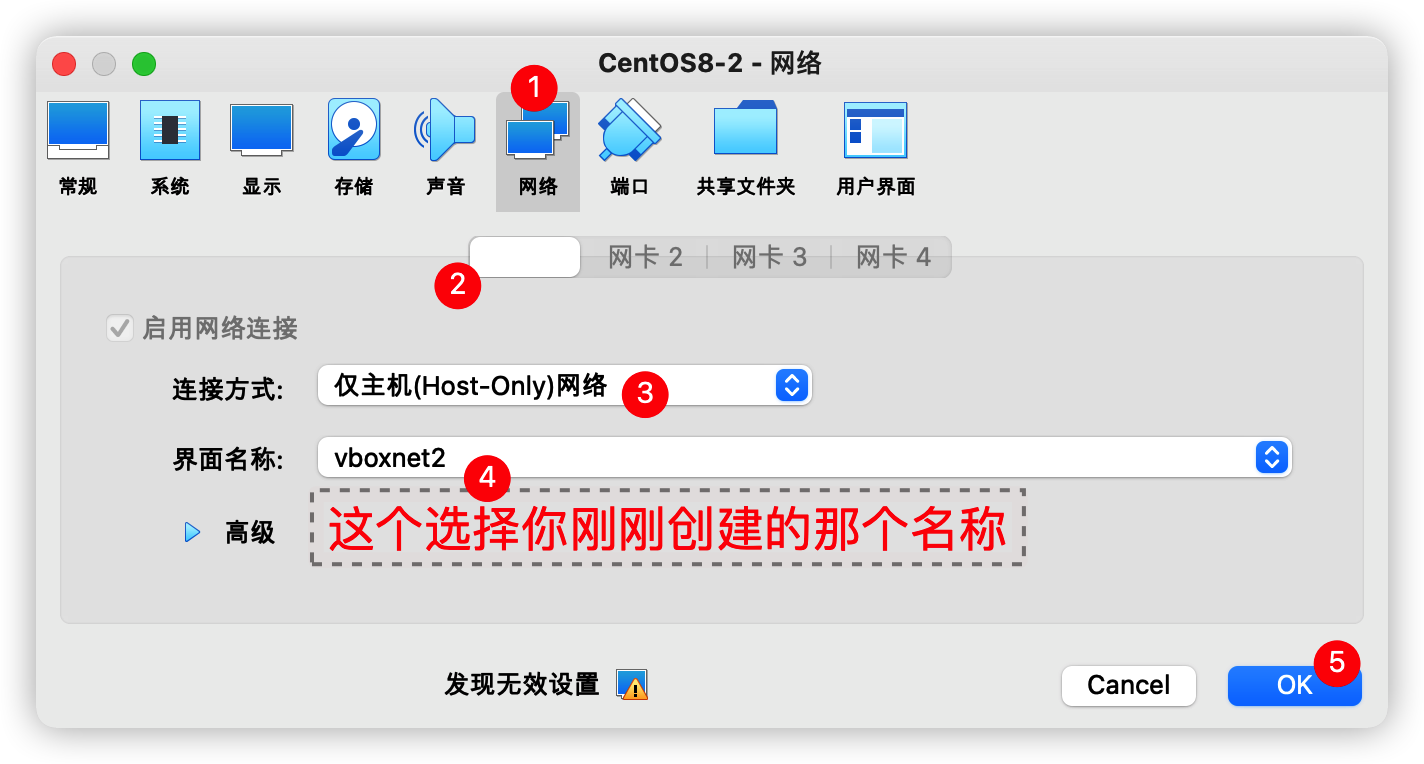 6. 进入虚拟机查看 IP 地址,使用 `ip addr` 命令查看 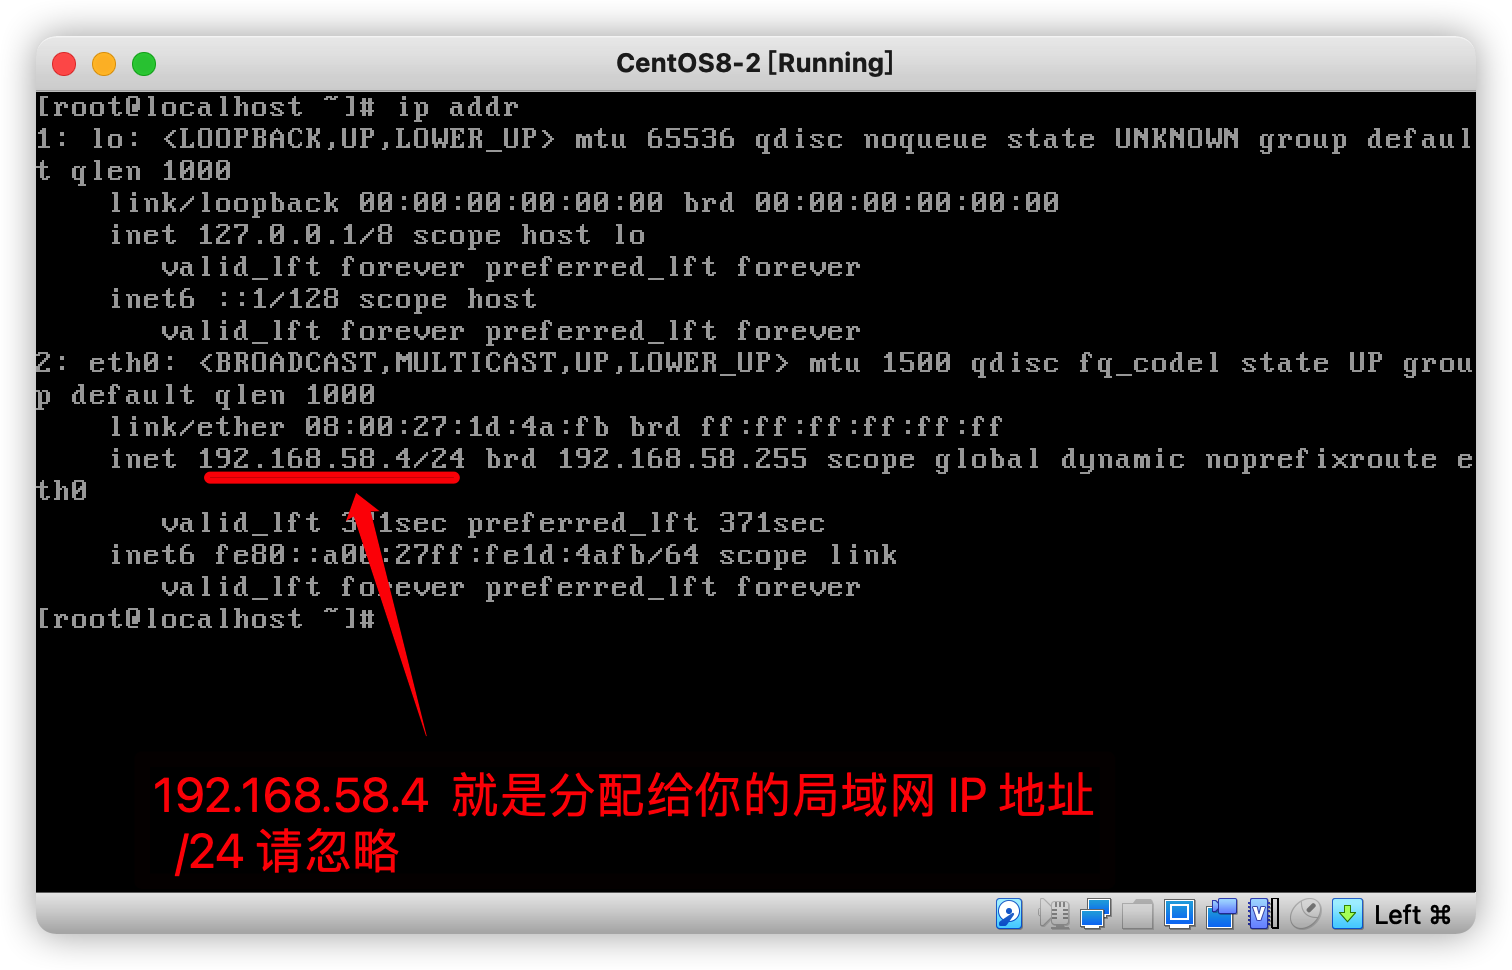 7. 如果你有多个虚拟机想要在同一个局域网,那么再从**第 4 步骤**再设置其它虚拟机即可,配置好后,可以通过 `ip addr` 获取本机的 IP 地址,然后用另一台虚拟机使用 ping 命令看是否能够 ping 通 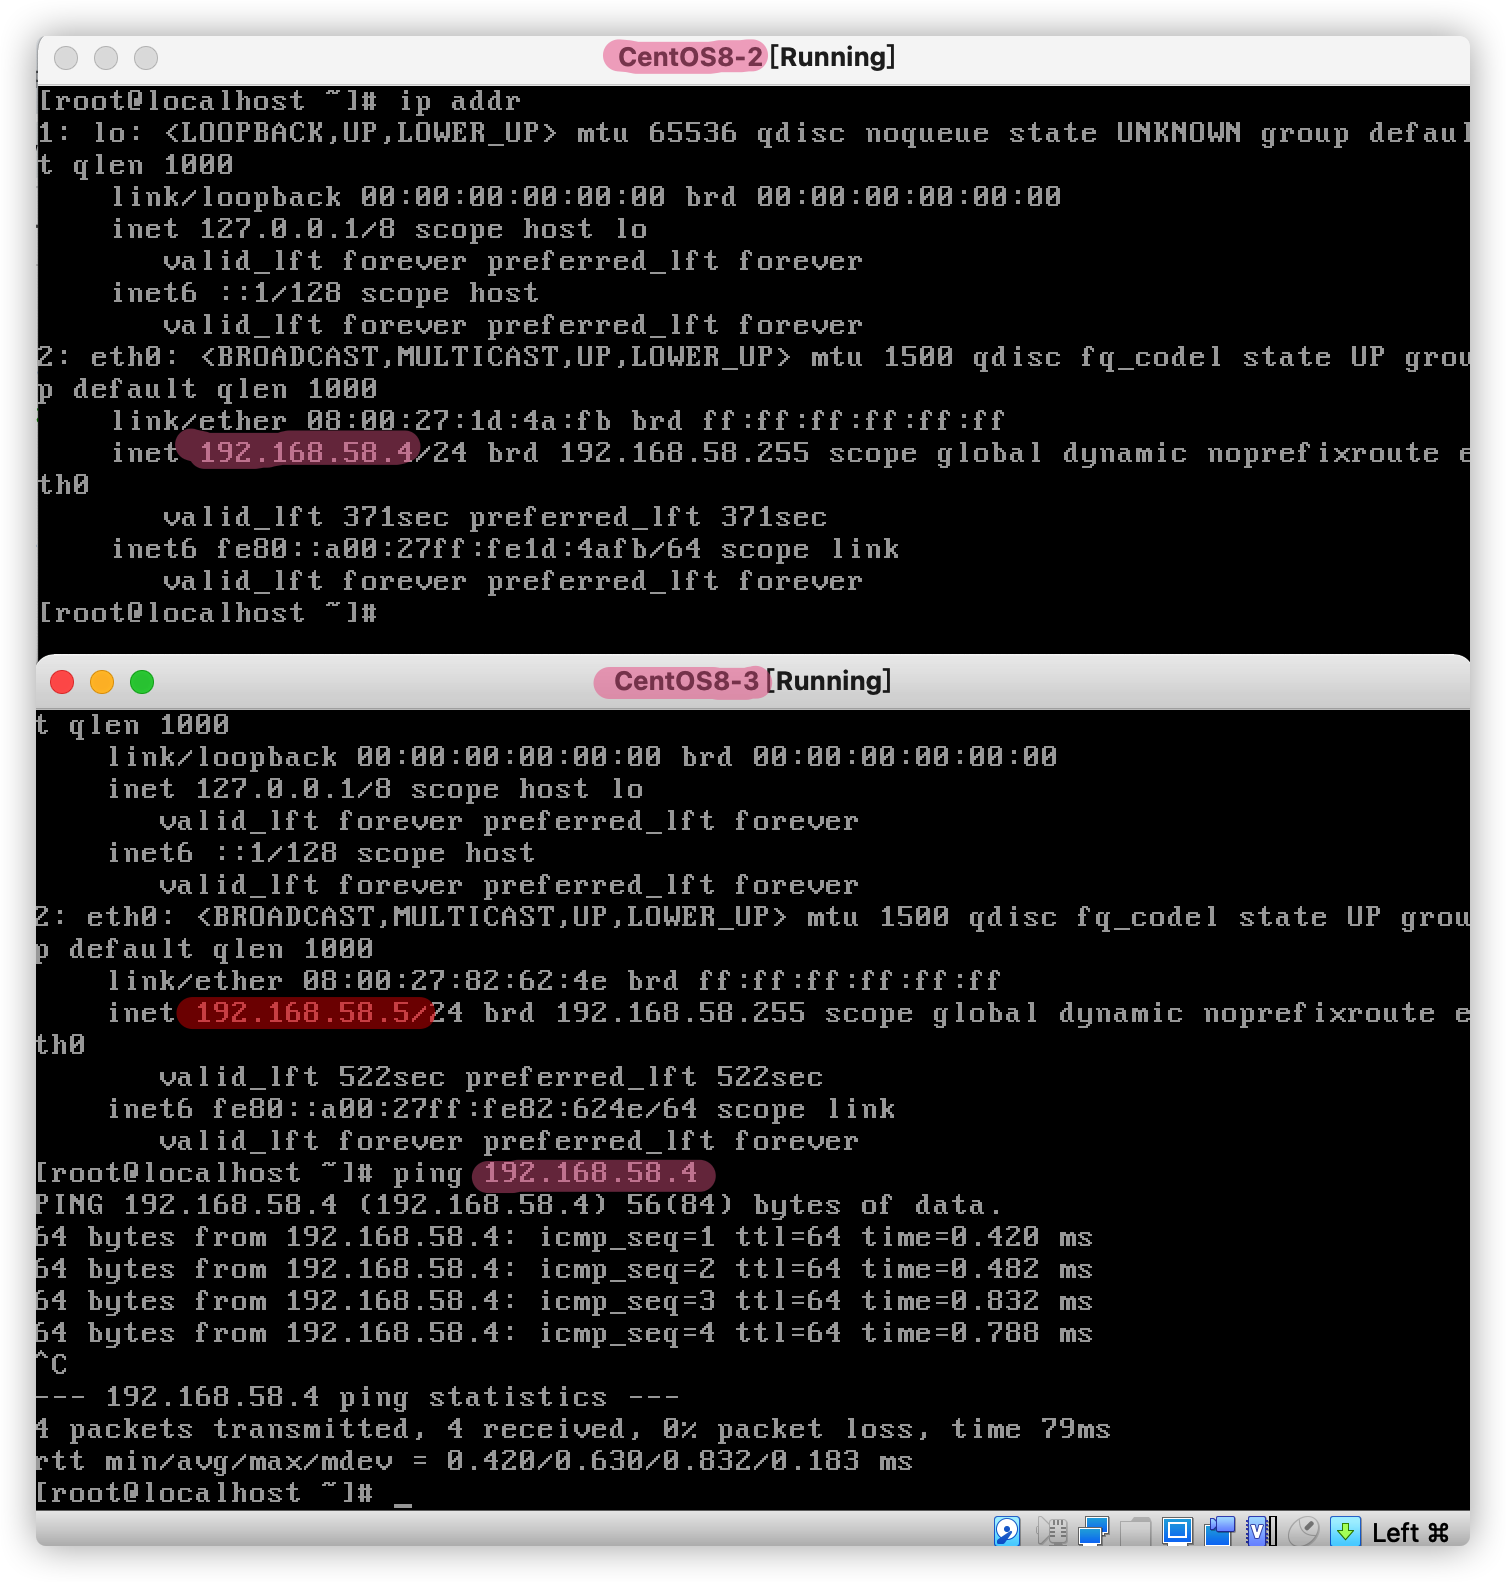 希望能这片够对你有所帮助,我也是前前后后花了许多时间去理解,现在大致能够知道怎么去使用,甚至搭建一个旁路由