使用 Certimate 批量部署腾讯云 CDN 证书,解放双手 作者: Shine 时间: 2025-05-02 分类: DevOps 评论 ## Certimate 介绍 GitHub:https://github.com/usual2970/certimate 做个人产品或者在中小企业里负责运维的同学,会遇到要管理多个域名的情况,需要给域名申请证书。但是手动申请证书有以下缺点: - 😱 麻烦:申请证书并部署到服务的流程虽不复杂,但也挺麻烦的,犹其是你有多个域名需要维护的时候。 - 😭 易忘:另外当前免费证书的有效期只有 90 天,这就要求你定期的操作,增加了工作量的同时,你也很容易忘掉续期,从而导致网站访问不了。 Certimate 就是为了解决上述问题而产生的,它具有以下优势: - **本地部署**:一键安装,只需要下载二进制文件,然后直接运行即可。同时也支持 Docker 部署、源代码部署等方式。 - **数据安全**:由于是私有部署,所有数据均存储在自己的服务器上,不会经过第三方,确保数据的隐私和安全。 - **操作简单**:简单配置即可轻松申请 SSL 证书并部署到指定的目标上,在证书即将过期前自动续期,从申请证书到使用证书完全自动化,无需人工操作。 Certimate 旨在为用户提供一个安全、简便的 SSL 证书管理解决方案。 ## 我的痛点 现在免费 SSL 证书基本都是 3 个月有效期,然而我在腾讯云 CDN 部署了非常多的域名,导致每次证书更新都非常麻烦。 但是现在我可以借助 Certimate 可以很方便的管理和部署 SSL 证书到腾讯云 CDN! 详细使用步骤建议查看 Certimate 官方文档进行操作,本片文章只是重点讲述“**使用 Certimate 批量部署腾讯云 CDN 证书**” ## 配置授权 1. 首先**新建授权**: 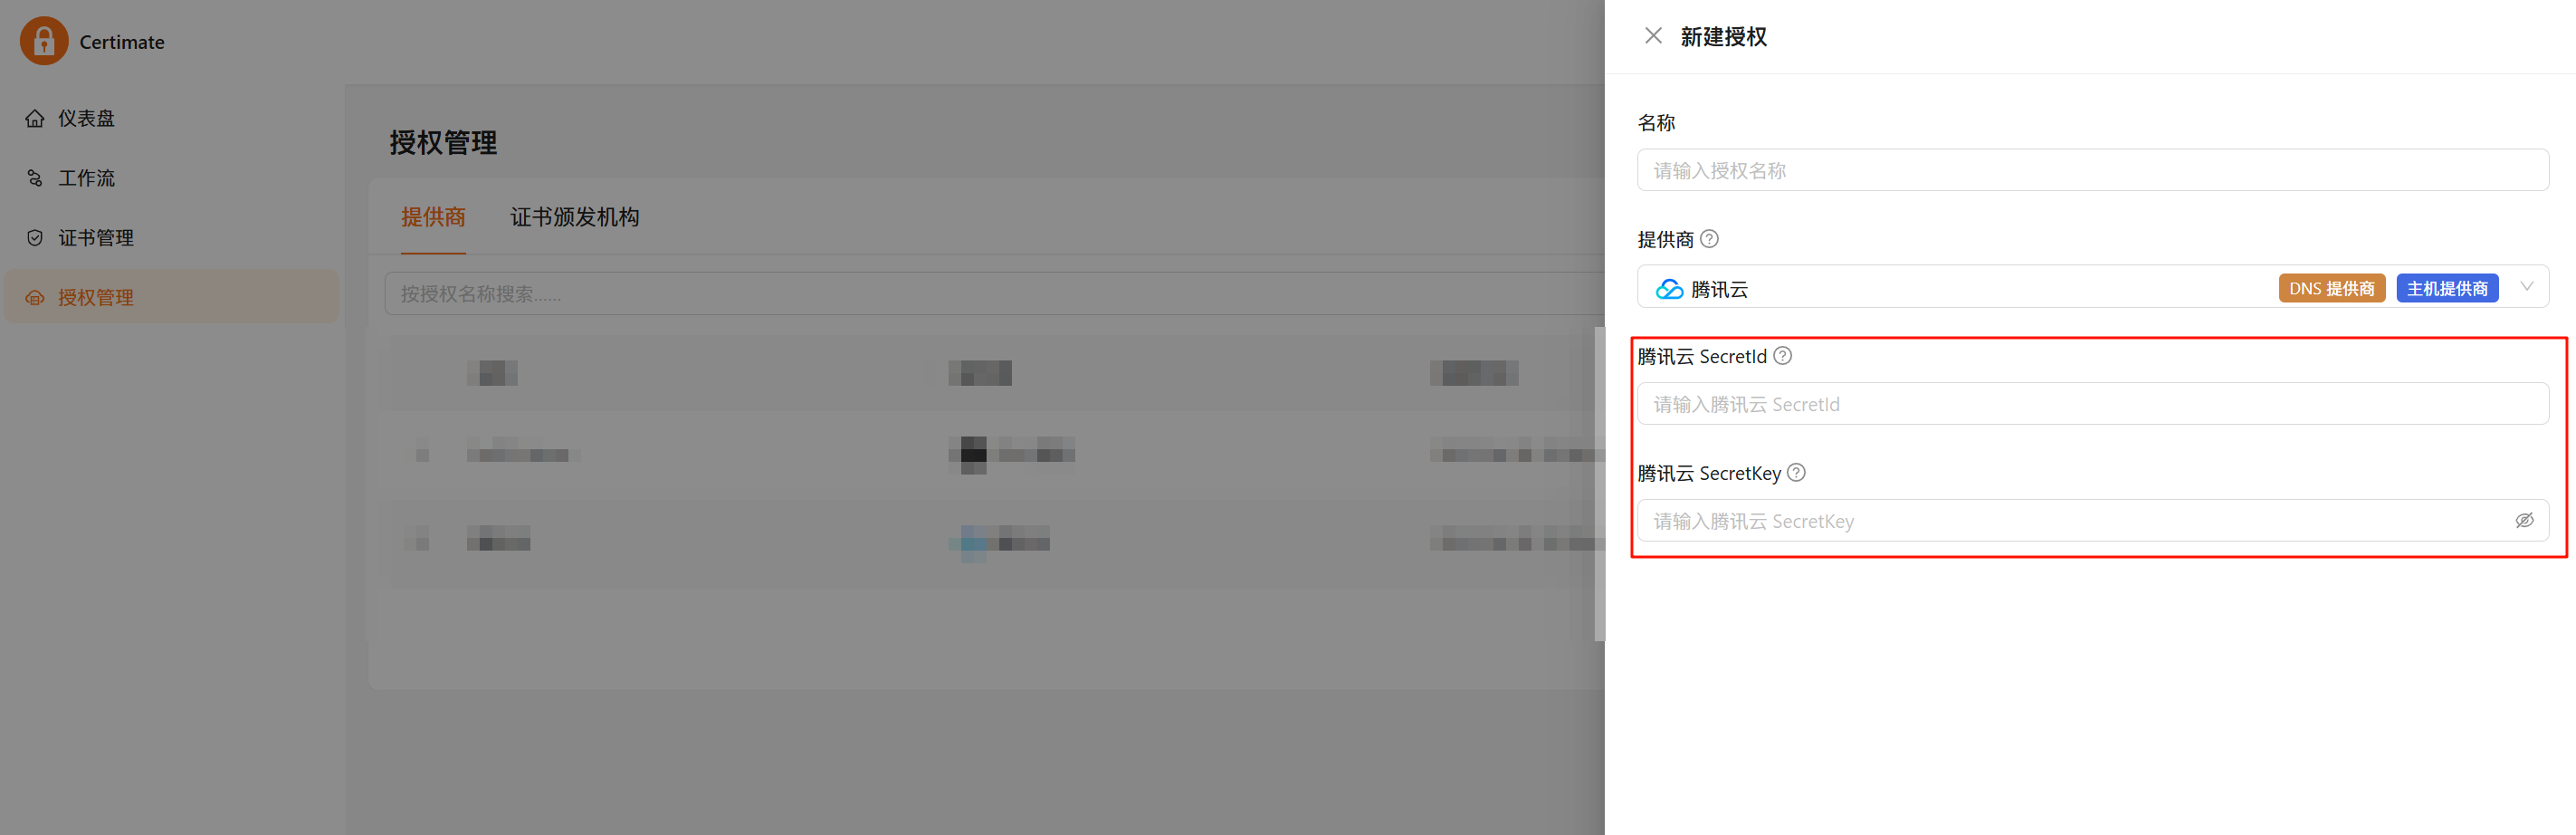 2. 腾讯云创建子账号,权限配置**权限策略**: - `QcloudSSLFullAccess` - `QcloudDNSPodFullAccess`(如果你的域名在腾讯云,则给予这个权限) 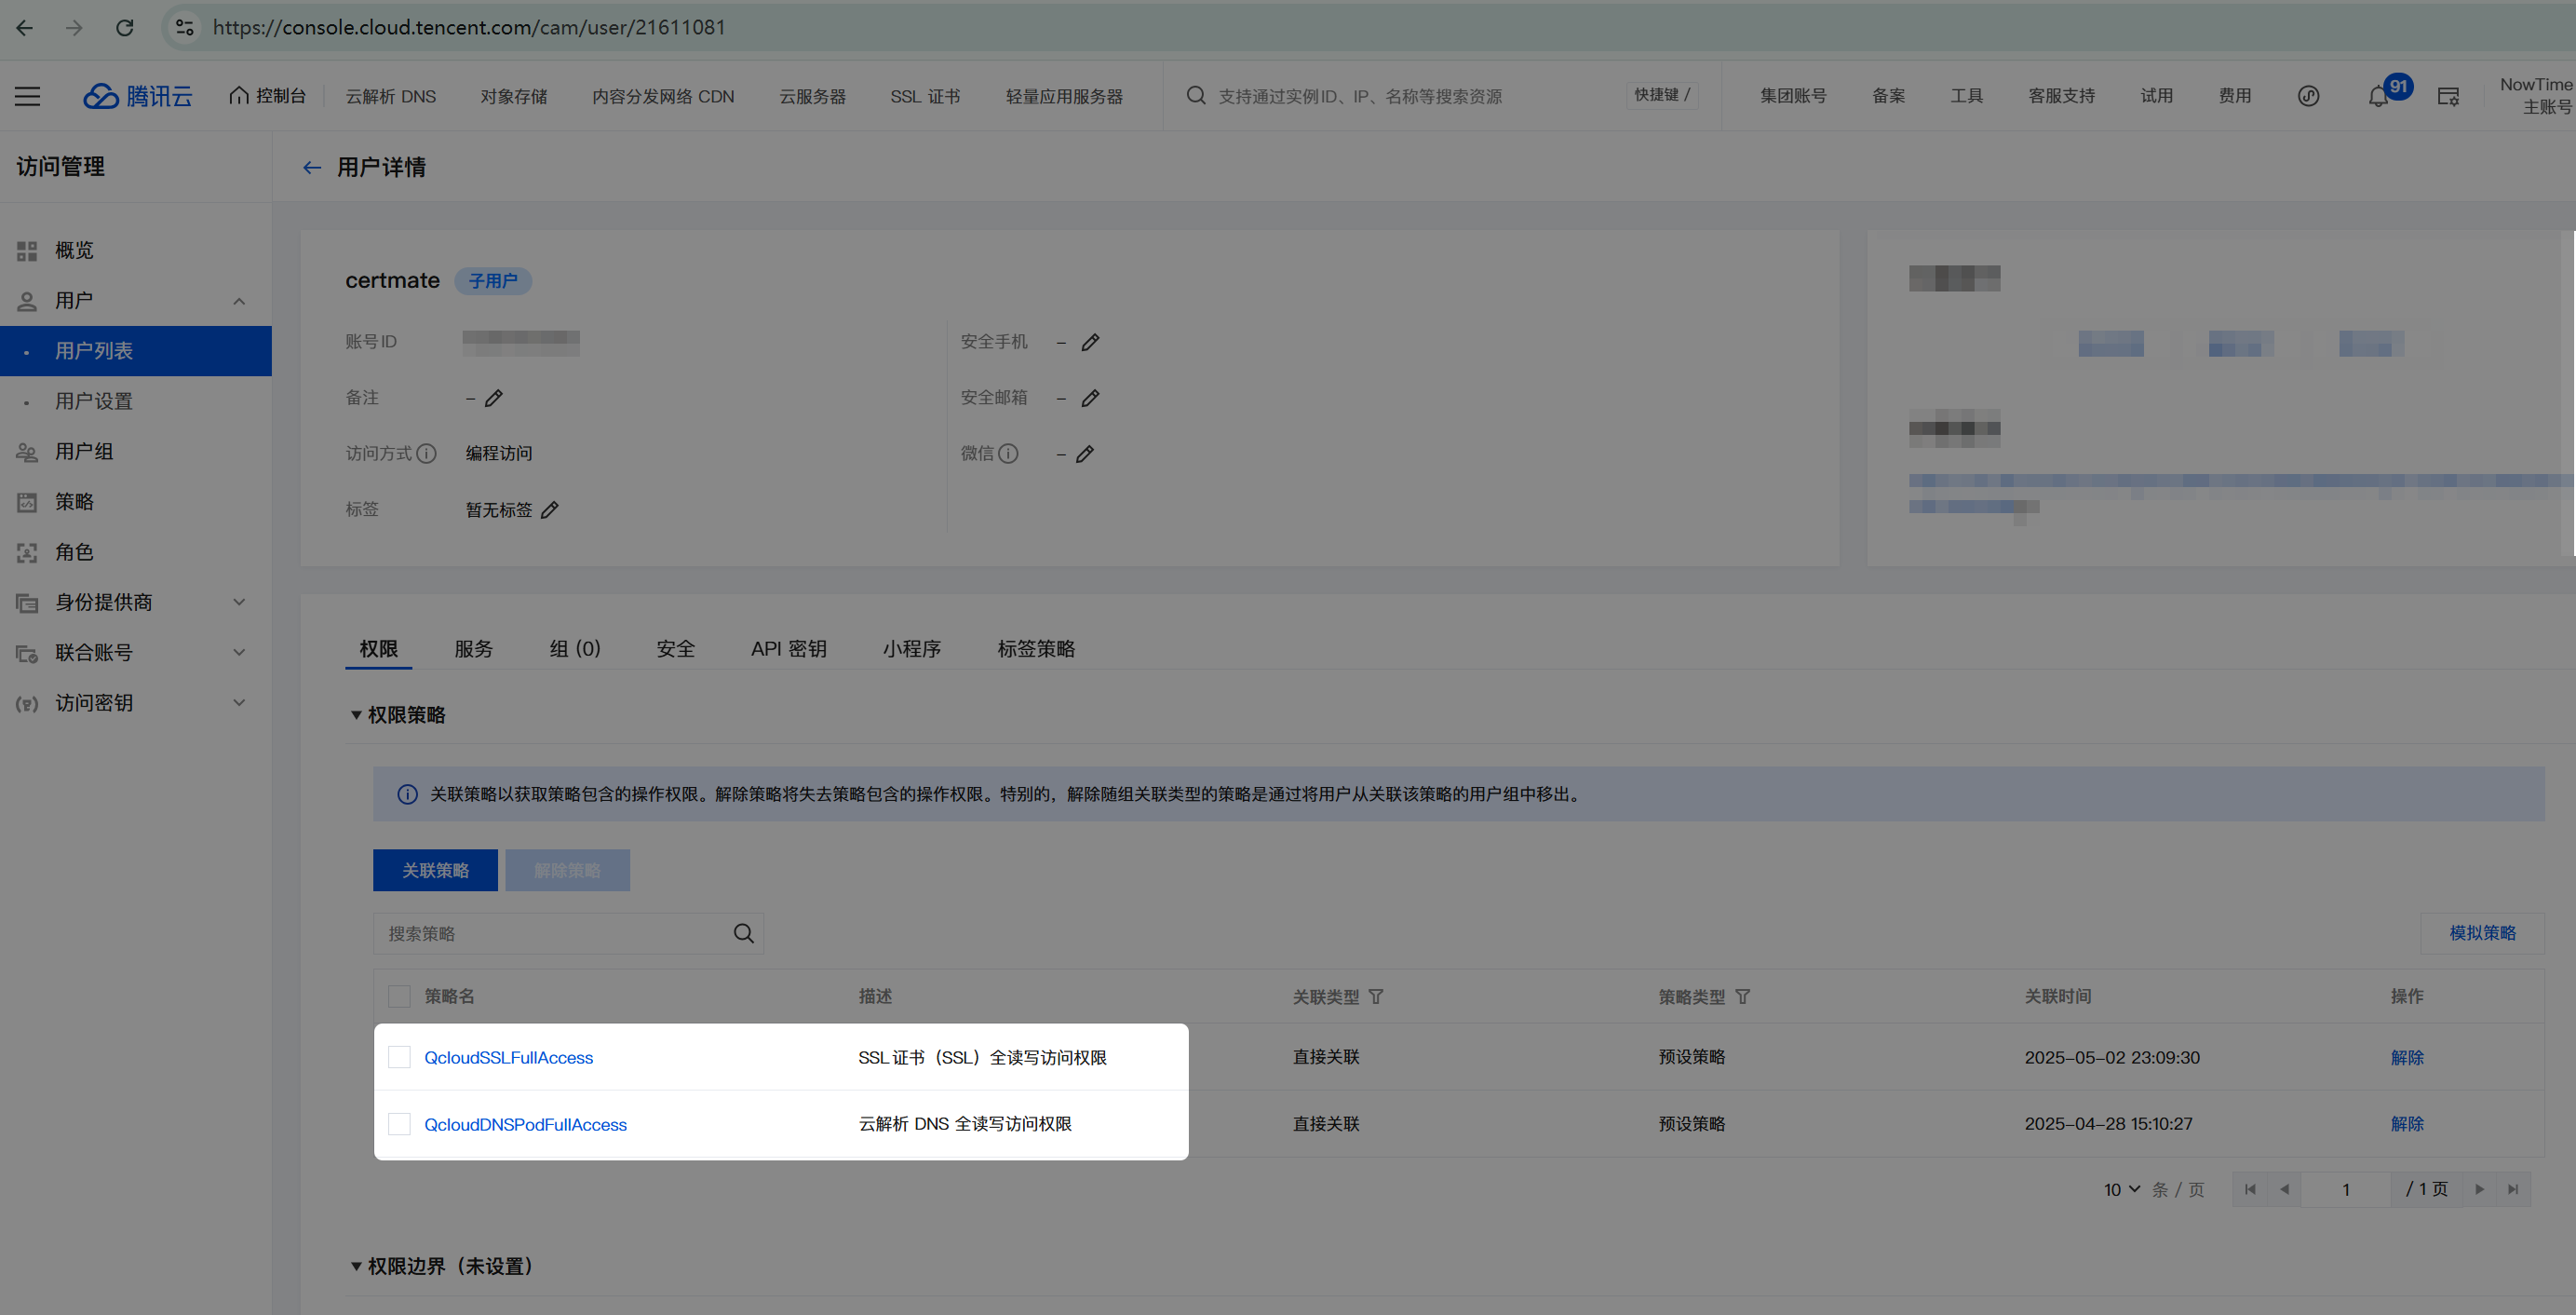 ## 配置 Certimate 工作流 1. 配置申请的证书,我这边申请的是 `*.nowtool.cn` 和 `nowtool.cn` 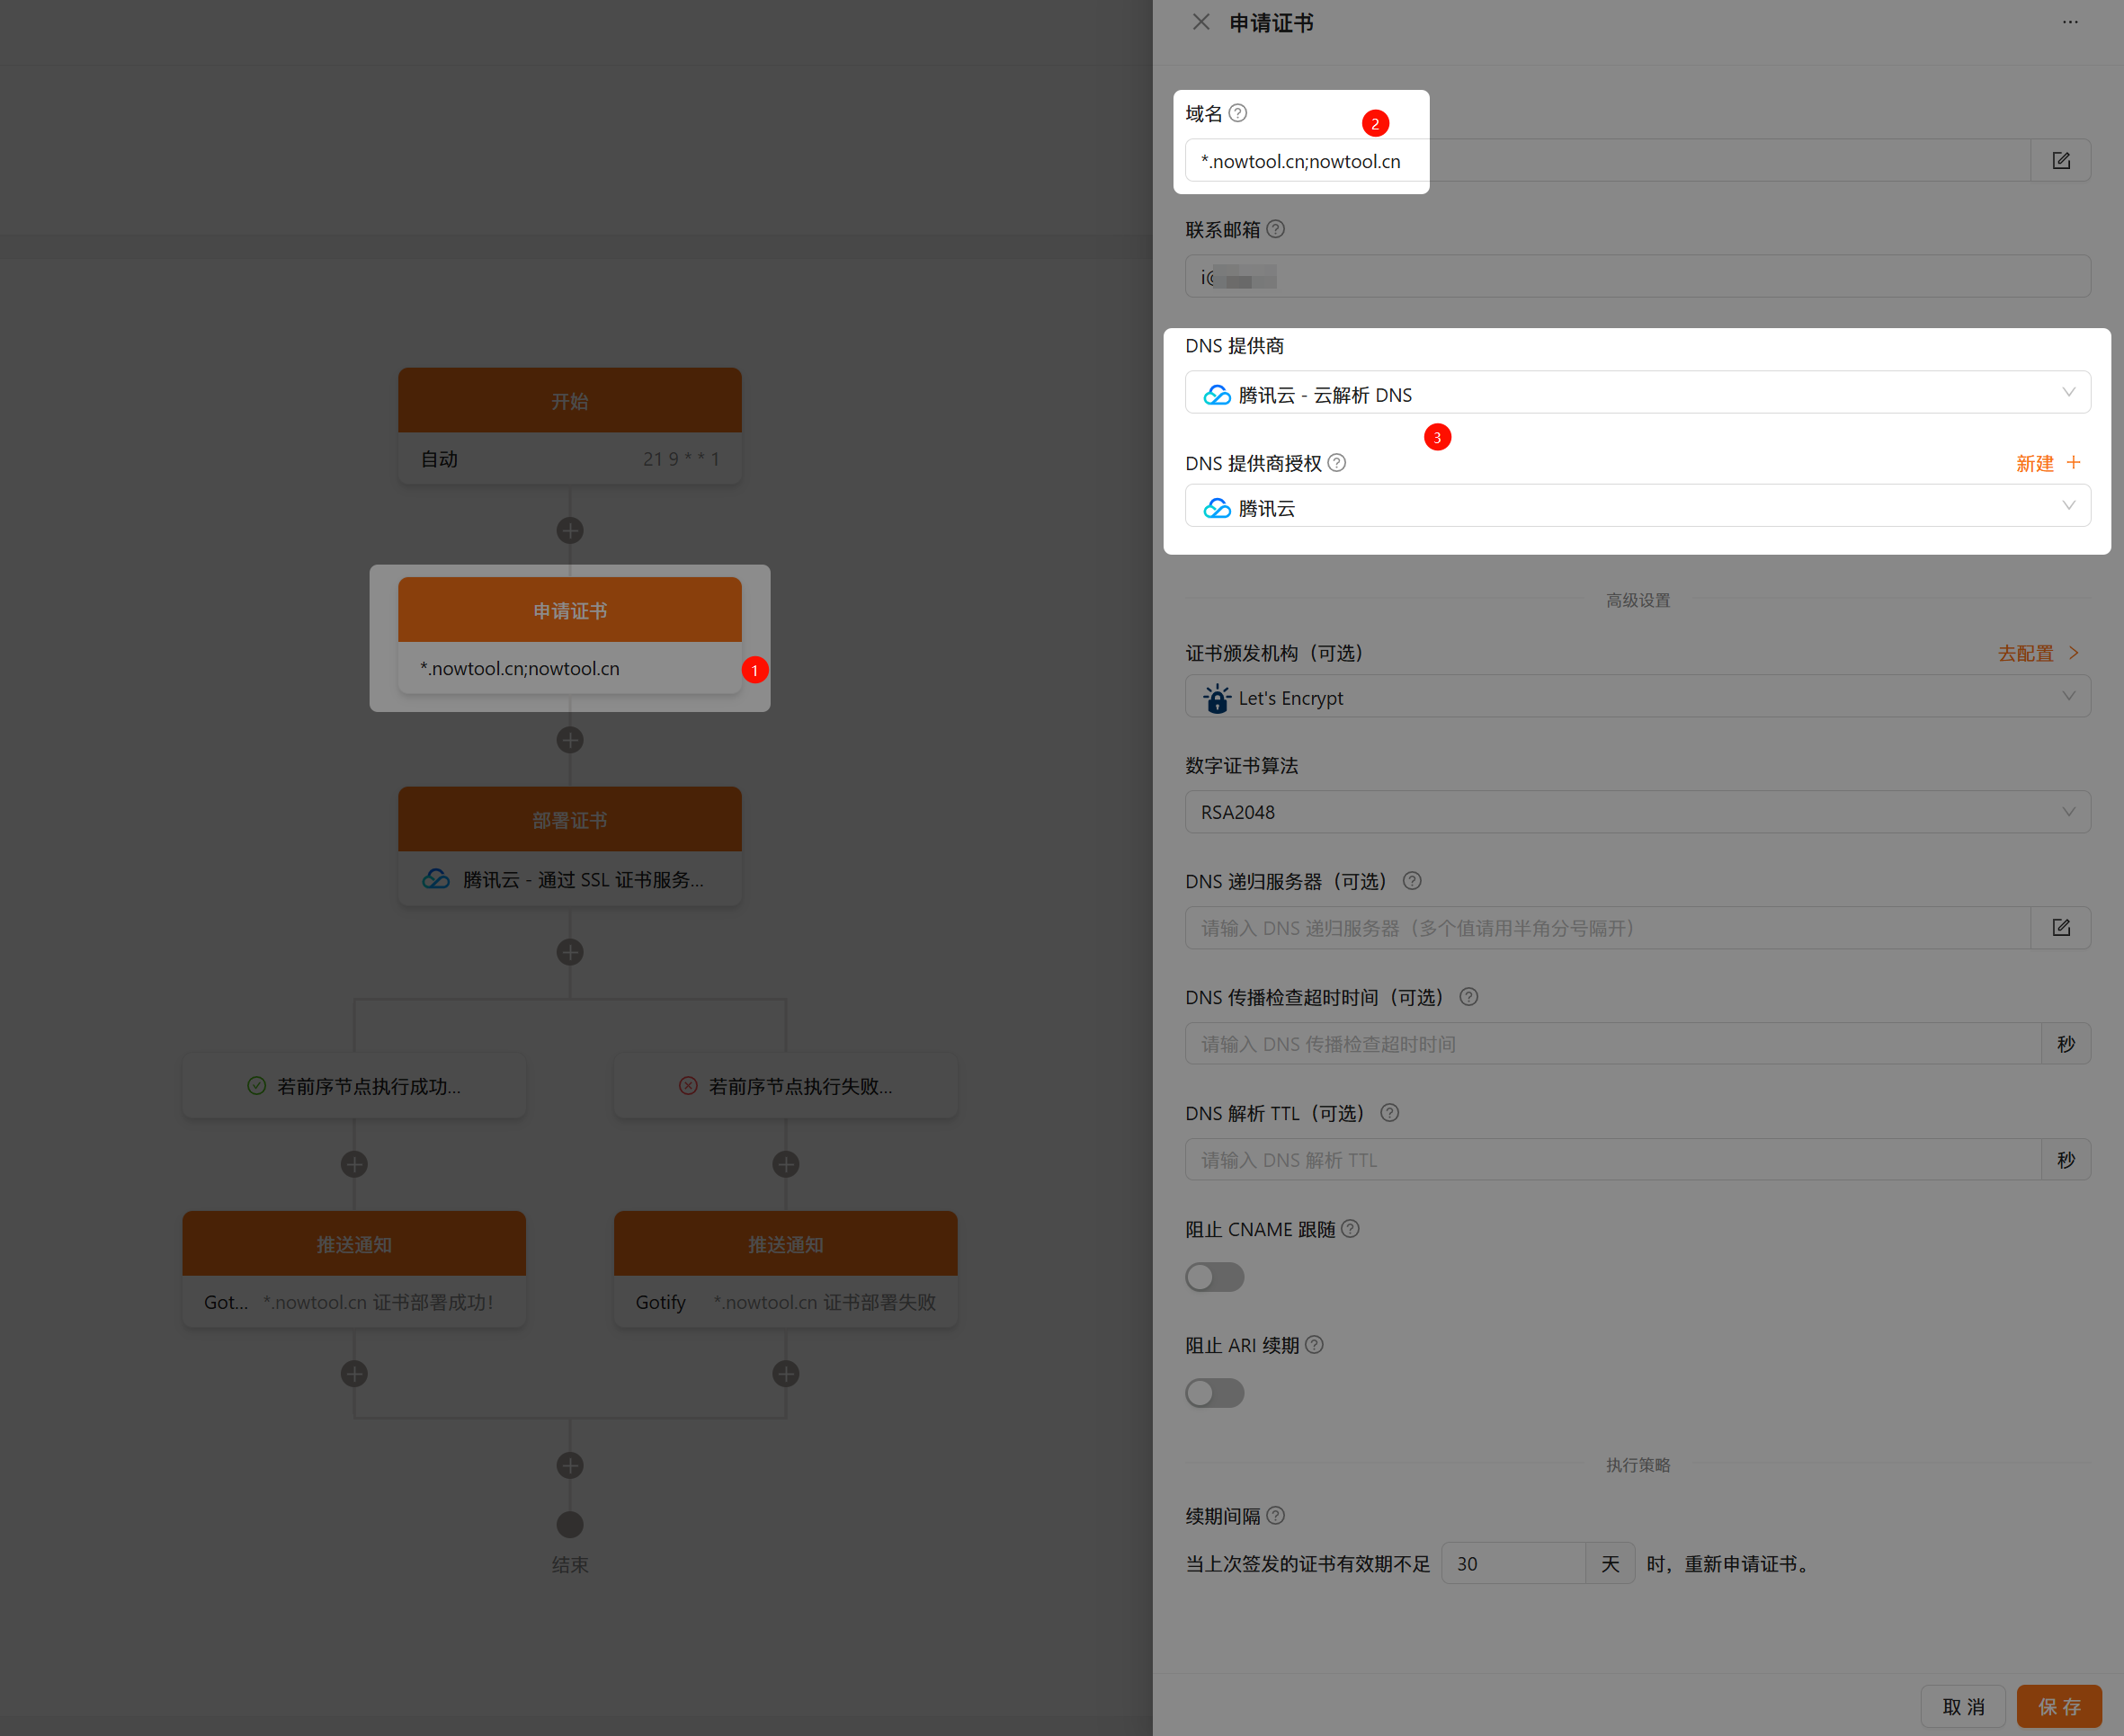 2. 按照如下图配置,特别说明:**腾讯云云产品地域**实测填写 `ap-guangzhou` 即可成功部署  ## 完成 去腾讯云控制台检查部署情况 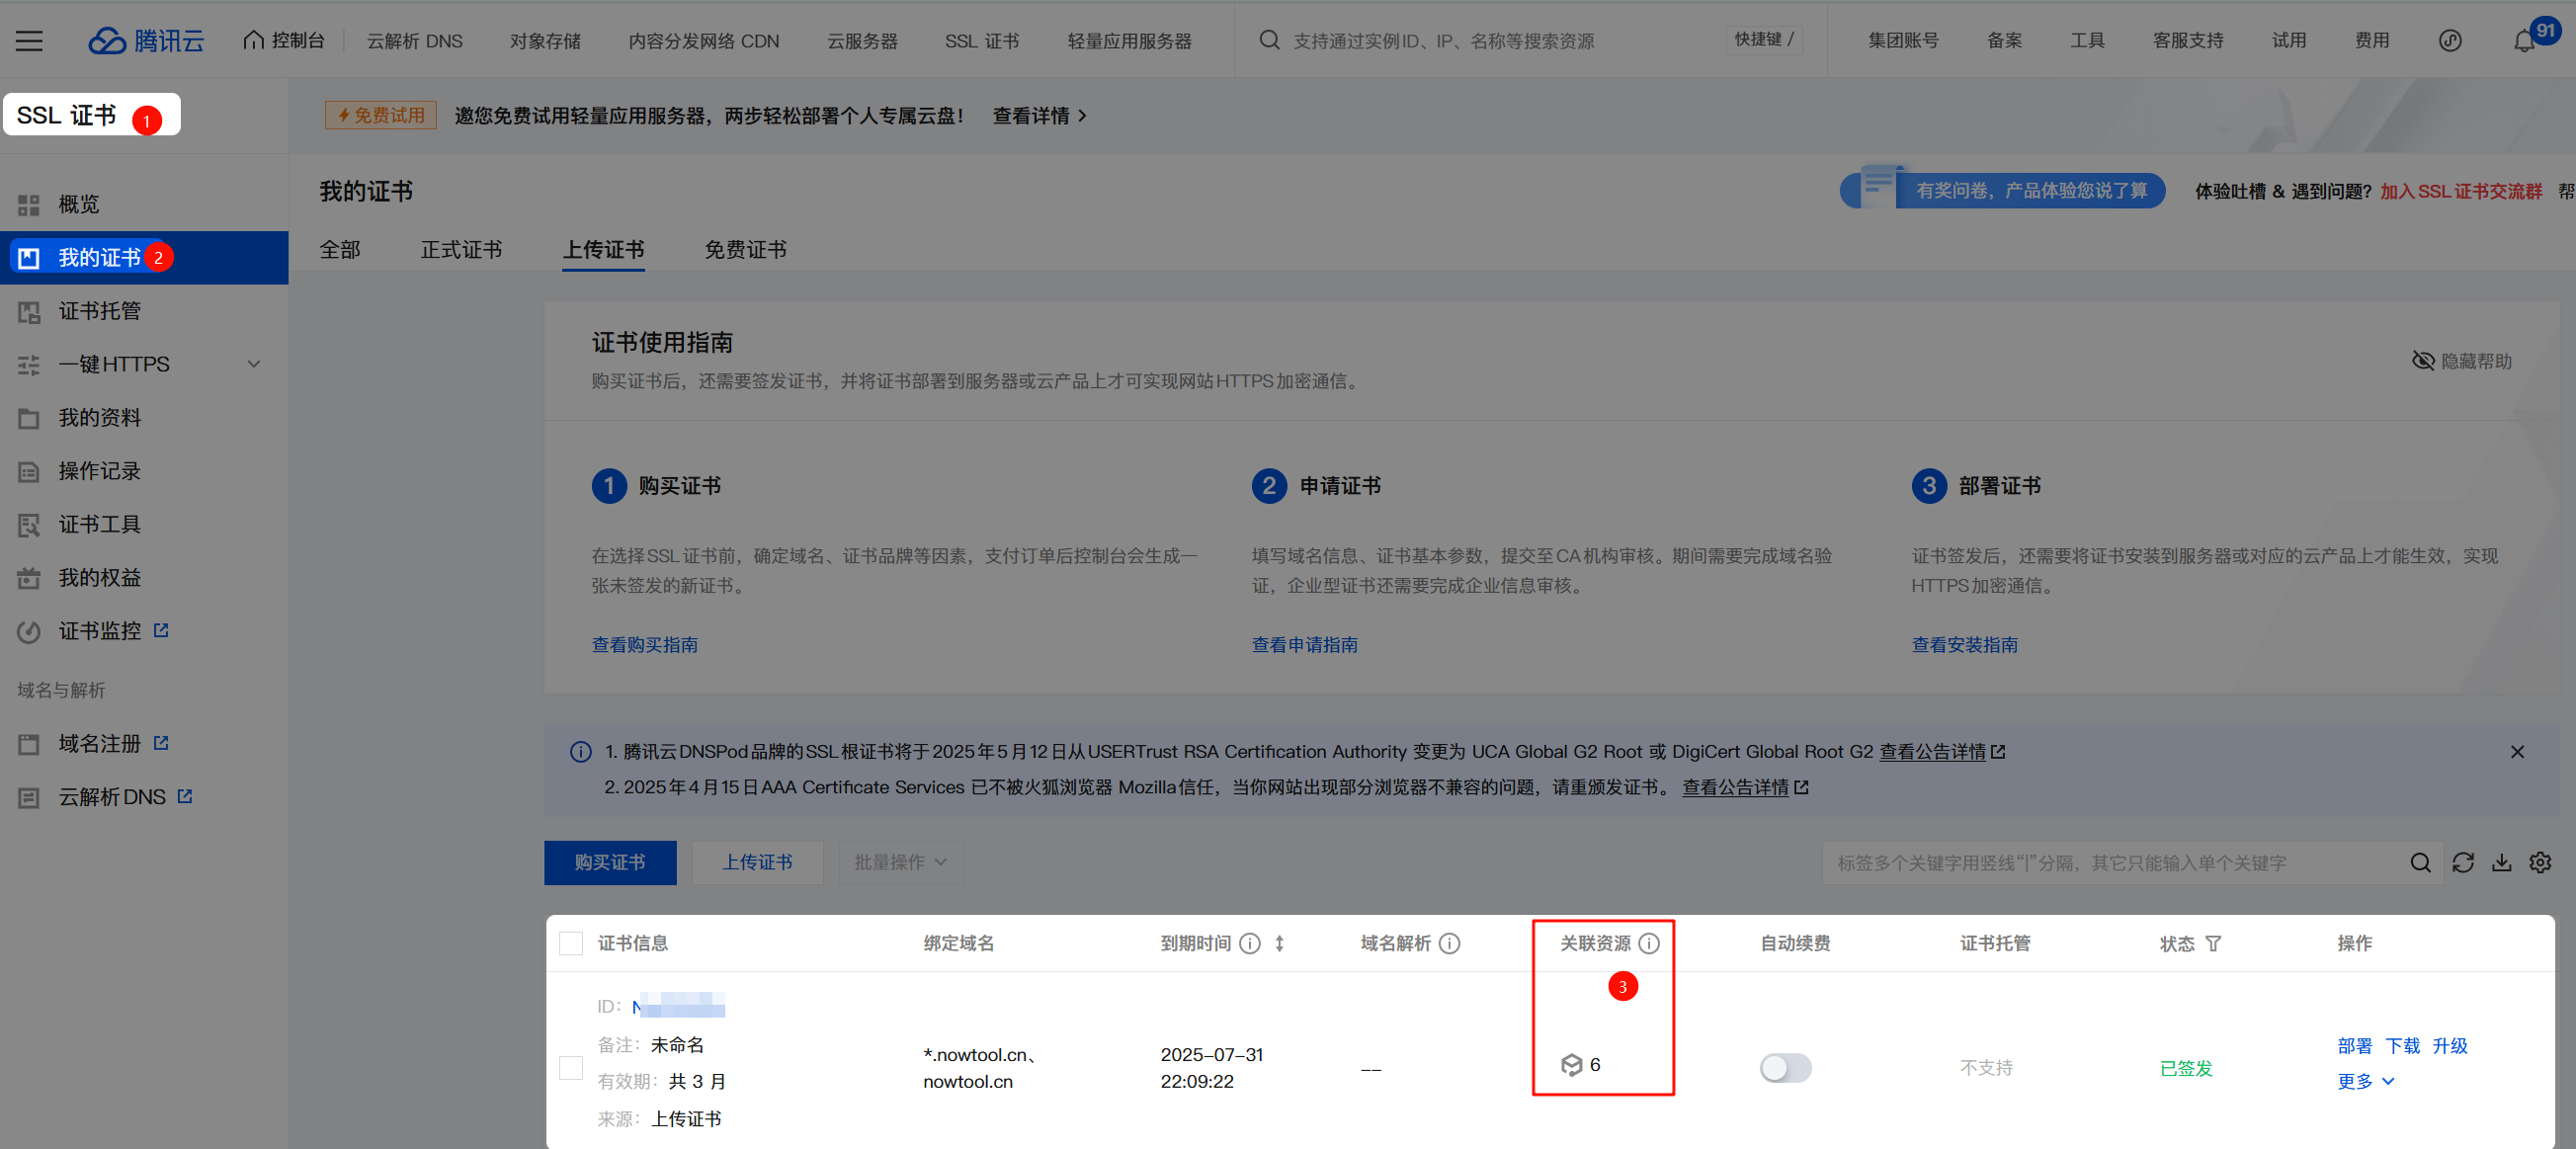
Kubernetes GitOps 配置架构:多环境配置管理的最佳实践 作者: Shine 时间: 2025-04-30 分类: Kubernetes,DevOps 评论 ## 背景介绍 在微服务架构和云原生应用的时代,如何有效管理多环境(开发、测试、预发布、生产)的 Kubernetes 配置成为了一个挑战。传统方法往往采用复制粘贴配置文件并修改环境特定值,这导致: 1. **维护噩梦**:相同配置散布在多个文件中,一项变更需要在多处修改 2. **配置漂移**:随着时间推移,各环境配置容易出现差异 3. **错误风险**:手动修改配置容易引入人为错误 4. **版本控制困难**:难以追踪哪些变更适用于哪些环境 为解决这些问题,本项目采用了基于 Kustomize 的 GitOps 配置架构。[Kustomize](https://kustomize.io/) 是 Kubernetes 原生的配置管理工具,允许我们在不使用模板的情况下定制资源配置。 ## 架构价值 这种架构带来几个关键优势: 1. **配置复用**:基础配置只定义一次,避免重复 2. **清晰分离**:环境特定的配置与基础配置明确分离 3. **声明式管理**:所有修改都是声明式的,使用 JSON Patch 等标准格式 4. **版本控制友好**:配置更改清晰可见,便于审计和回滚 5. **减少环境差异**:所有环境共享基础配置,减少意外差异 6. **简化运维**:标准化的配置方法降低维护成本 ## 目录结构 ``` .gitops/ ├── base/ # 基础配置,包含所有环境共用的资源定义 │ ├── deployment.yaml # 基础部署配置 │ ├── service.yaml # 服务配置 │ ├── ingress.yaml # 基础 Ingress 配置 │ └── kustomization.yaml # 基础 kustomization 文件 │ └── overlays/ # 环境特定配置(覆盖层) ├── test/ # 测试环境 │ └── kustomization.yaml # 测试环境特定的配置 ├── staging/ # 预发布环境 │ └── kustomization.yaml # 预发布环境特定的配置 └── production/ # 生产环境 └── kustomization.yaml # 生产环境特定的配置 ``` 这种结构遵循了 [Kustomize 推荐的 base/overlays 模式](https://github.com/kubernetes-sigs/kustomize/blob/master/docs/glossary.md#overlay),是管理多环境配置的标准做法。 ## 深入理解 base/overlays 模式 ### Base(基础层) `base/` 目录包含了应用的核心配置,定义了应用在任何环境中都需要的资源和设置。这些资源被设计为"默认值",通常是开发环境或最通用的配置。基础层应当是自给自足的,可以独立部署(虽然实际应用中通常不会这样做)。 典型的基础层包括: - 部署(Deployment)定义 - 服务(Service)定义 - 基本的 Ingress 规则 - ConfigMap 和 Secret 的结构(但不包含环境特定的值) - 资源配额和限制的默认值 ### Overlays(覆盖层) `overlays/` 目录包含了每个环境的特定配置。每个环境(如 test、staging、production)都有自己的子目录,其中的 `kustomization.yaml` 文件引用了基础层,并定义了该环境需要的修改。 覆盖层不是完整的独立配置,而是对基础层的补充或修改。它们通过各种补丁机制(如 strategic merge patches、JSON patches)来调整基础配置以适应特定环境的需求。 ## 使用方法 ### 基础配置 基础配置在 `base/` 目录中定义,包括所有环境通用的资源。这些资源会被各环境的 overlay 配置引用并根据需要进行修改。 一个典型的基础 `kustomization.yaml` 文件看起来像这样: ```yaml apiVersion: kustomize.config.k8s.io/v1beta1 kind: Kustomization resources: - deployment.yaml - service.yaml - ingress.yaml commonLabels: app: my-application ``` ### 环境特定配置 每个环境在 `overlays/` 目录下有自己的子目录(如 `test/`、`staging/`、`production/`)。这些目录中的 `kustomization.yaml` 文件会引用基础配置,并应用环境特定的修改。 #### 为什么需要修改 Ingress 主机名? 在多环境部署中,我们通常需要为不同的环境配置不同的访问域名。这有几个重要原因: 1. **环境隔离**:每个环境(开发、测试、预发布、生产)需要有自己独立的访问入口,以避免相互干扰 2. **访问控制**:可以对不同环境的域名实施不同的访问控制策略(如测试环境仅内网访问) 3. **DNS 管理**:通过子域名区分环境,使 DNS 管理更加清晰 4. **监控和分析**:可以单独监控每个环境的流量和性能 5. **SSL 证书**:不同环境可能需要不同的 SSL 证书配置 #### 实际案例说明 假设我们有一个名为 "myapp" 的应用程序,需要在多个环境中部署。下面是一个真实案例的域名规划: | 环境 | 主域名 | API 域名 | 其它服务域名 | |------|--------|---------|------------| | 生产环境 | myapp.example.cc | api.example.cc | webhook.example.cc | | 预发布环境 | staging.example.cc | api-staging.example.cc | webhook-staging.example.cc | | 测试环境 | my-test.example.cc | api-test.example.cc | webhook-test.example.cc | | 开发环境 | dev.example.cc | api-dev.example.cc | webhook-dev.example.cc | 在基础配置(base/ingress.yaml)中,我们可能定义了生产环境的域名: ```yaml apiVersion: networking.k8s.io/v1 kind: Ingress metadata: name: nowtime-main-backend-ingress spec: rules: - host: myapp.example.cc http: paths: - path: / pathType: Prefix backend: service: name: main-service port: number: 80 - host: api.example.cc http: paths: - path: / pathType: Prefix backend: service: name: api-service port: number: 80 ``` 而在测试环境的配置中,我们需要将这些域名替换为测试环境的域名。这就是为什么我们在 `overlays/test/kustomization.yaml` 中使用 patches 修改主机名: ```yaml apiVersion: kustomize.config.k8s.io/v1beta1 kind: Kustomization namespace: nowtime-test # 设置命名空间 resources: - ../../base # 引用基础配置 patches: - patch: |- - op: replace path: /spec/rules/0/host value: my-test.example.cc - op: replace path: /spec/rules/1/host value: api-test.example.cc - op: replace path: /spec/rules/2/host value: webhook-test.example.cc - op: replace path: /spec/rules/3/host value: url-test.example.cc target: kind: Ingress name: nowtime-main-backend-ingress ``` 这种方法的优势在于: - **集中管理**:所有环境特定的域名都集中在一个文件中管理 - **一目了然**:可以清晰地看到该环境使用的所有域名 - **减少错误**:避免复制整个 Ingress 定义时可能引入的错误 - **便于审计**:域名变更记录清晰可见 - **自动化友好**:可以轻松集成到 CI/CD 流程中 #### 部署验证 应用配置后,可以检查 Ingress 是否正确配置了测试环境的域名: ```bash # 查看生成的完整 Ingress 配置 kubectl kustomize .gitops/overlays/test/ | grep -A 10 "kind: Ingress" # 应用配置并检查实际 Ingress 资源 kubectl apply -k .gitops/overlays/test/ kubectl get ingress -n nowtime-test kubectl describe ingress nowtime-main-backend-ingress -n nowtime-test ``` 验证 Ingress 控制器是否正确路由请求: ```bash # 测试域名解析(需确保 DNS 已配置或添加到本地 hosts 文件) curl -I https://my-test.example.cc curl -I https://api-test.example.cc ``` ## 常见操作实践 ### 修改命名空间 在 Kubernetes 中,命名空间是实现多租户和资源隔离的关键机制。在多环境架构中,每个环境通常都有自己的命名空间。 在每个环境的 `kustomization.yaml` 文件中设置 `namespace` 字段: ```yaml namespace: nowtime-test ``` 这会将引用的所有资源的命名空间修改为指定值,无需手动修改每个资源文件。 ### 修改 Ingress 主机名 在多环境架构中,不同环境通常有不同的访问域名。使用 JSON Patch 操作来修改 Ingress 规则中的主机名: ```yaml patches: - patch: |- - op: replace path: /spec/rules/0/host value: your-new-hostname.example.cc target: kind: Ingress name: your-ingress-name ``` 这种方法比完全重定义 Ingress 资源更简洁、更不容易出错。 ### 修改副本数 不同环境通常需要不同规模的部署。例如,生产环境可能需要多个副本以实现高可用性和负载均衡,而测试环境可能只需要一个副本以节省资源。 ```yaml patches: - patch: |- - op: replace path: /spec/replicas value: 3 target: kind: Deployment name: your-deployment-name ``` ### 添加环境变量 环境变量是配置应用行为的常用方法,不同环境可能需要不同的环境变量值。 ```yaml patches: - patch: |- - op: add path: /spec/template/spec/containers/0/env/- value: name: ENV_NAME value: "env_value" target: kind: Deployment name: your-deployment-name ``` ## JSON Patch 详解 [JSON Patch (RFC 6902)](https://datatracker.ietf.org/doc/html/rfc6902) 是一种用于描述对 JSON 文档的修改的标准格式。在 Kustomize 中,它是实现精细化配置修改的强大工具。 JSON Patch 定义了六种操作: - `add`: 添加一个值 - `remove`: 删除一个值 - `replace`: 替换一个值 - `move`: 移动一个值 - `copy`: 复制一个值 - `test`: 测试一个值是否匹配 路径使用 [JSON Pointer (RFC 6901)](https://datatracker.ietf.org/doc/html/rfc6901) 格式表示,例如 `/spec/replicas` 指向 JSON 文档中的 `spec.replicas` 字段。 ## 部署应用 使用 Kustomize 部署应用非常简单,只需指定环境的 overlay 目录即可。 ```bash # 查看生成的资源(不实际应用) kubectl kustomize .gitops/overlays/test/ # 应用配置 kubectl apply -k .gitops/overlays/test/ ``` Kubernetes 1.14+ 内置了 Kustomize 支持,不需要单独安装 Kustomize 命令行工具。 ## GitOps 工作流 这种配置架构非常适合 GitOps 工作流,将 Git 作为唯一的事实来源: 1. 所有配置变更通过 Git 仓库进行 2. CI/CD 系统监控仓库变更 3. 变更合并后自动应用到相应环境 4. 集群状态始终与 Git 仓库中的定义一致 推荐的工具有 [Flux](https://fluxcd.io/) 和 [ArgoCD](https://argoproj.github.io/argo-cd/),它们可以自动监控仓库并将变更应用到集群。 ## 相关资源 - [Kustomize 官方文档](https://kubectl.docs.kubernetes.io/references/kustomize/) - [Kubernetes Kustomize 指南](https://kubernetes.io/docs/tasks/manage-kubernetes-objects/kustomization/) - [JSON Patch 规范 (RFC 6902)](https://datatracker.ietf.org/doc/html/rfc6902) - [Kustomize Patches 文档](https://kubectl.docs.kubernetes.io/references/kustomize/kustomization/patches/) - [Kustomize GitHub 仓库](https://github.com/kubernetes-sigs/kustomize) - [GitOps 工作组](https://github.com/open-gitops/open-gitops) ## 最佳实践 1. **保持基础配置通用**:基础配置应包含所有环境共享的设置,环境特定的设置应在 overlay 中处理。避免在基础配置中硬编码环境特定的值。 2. **使用版本控制**:所有配置更改都应经过版本控制,便于跟踪变更和回滚。使用 Git 分支模型管理不同环境的配置更新流程。 3. **使用 CI/CD 流水线**:自动部署配置更改,减少手动错误。配置应该在部署前自动验证和测试。 4. **命名规范**:使用一致的命名约定,使资源之间的关系更加清晰。建议在资源名称中包含应用名和环境标识。 5. **限制对基础配置的修改**:优先通过 patches 修改配置,而不是更改基础资源文件。这保持了配置的清晰分离。 6. **明确文档化**:记录每个环境的特殊配置和差异原因,帮助团队成员理解配置决策。 7. **使用环境变量和 ConfigMap**:将配置参数外部化,避免硬编码配置值。 8. **实施安全控制**:对不同环境的访问权限实施适当的 RBAC 控制,尤其是生产环境。 --- 通过这种架构,我们能够实现配置的 DRY(Don't Repeat Yourself)原则,大大减少了跨环境维护 Kubernetes 配置的工作量和错误风险。它为我们提供了一种标准化、可靠且可扩展的方法来管理应用在从开发到生产的整个生命周期中的配置。
Window-Switcher:提升你的 Windows 多窗口操作体验 作者: Shine 时间: 2025-04-28 分类: Windows 评论 最近发现的小工具 —— [Window-Switcher](https://github.com/sigoden/window-switcher "Window-Switcher"),它彻底改变了我在 Windows 上切换窗口的方式。如果你像我一样经常同时打开多个窗口,尤其是同一应用的多个窗口(比如多个浏览器窗口、多个文档等),那么这个工具绝对值得一试! ## 它能做什么? Window-Switcher 提供了两个超实用的快捷键功能: 1. 使用 **Alt+`(反引号)** 在同一应用程序的多个窗口之间快速切换 - 这个功能太赞了!比如我打开了五个 Chrome 窗口,不用再去任务栏点来点去,只需按 Alt+` 就能快速切换 2. 使用 **Alt+Tab** 在不同应用之间切换(默认是禁用的,需要在配置中开启) - 这个替代了 Windows 自带的 Alt+Tab,但体验更好更流畅 使用方法超简单:按住 Alt 键,然后点击 `(反引号) 键循环切换窗口,松开两个键就会切换到你想要的窗口。同样的方式也适用于 Alt+Tab。 ## 为什么我喜欢它? 1. **提高工作效率**:不再需要使用鼠标点击任务栏或者在一堆窗口中寻找 2. **操作简单直观**:很快就能形成肌肉记忆 3. **完全可定制**:可以根据个人喜好修改快捷键和其他设置 4. **轻量级**:占用资源极少,不会拖慢电脑 5. **开源免费**:在 GitHub 上完全开源 ## 安装方法 安装非常简单: 1. 去 [GitHub Release 页面](https://github.com/sigoden/window-switcher/releases) 下载最新的 `window-switcher.zip` 2. 解压后得到 `window-switcher.exe`,可以放在任何你喜欢的位置 3. 双击运行即可,无需安装 如果你懂一点技术,也可以用 PowerShell 一键安装: ```powershell iwr -useb https://raw.githubusercontent.com/sigoden/window-switcher/main/install.ps1 | iex ``` ## 个性化配置 Window-Switcher 提供了丰富的自定义选项。你可以创建一个名为 `window-switcher.ini` 的配置文件(放在与 exe 相同的目录下),内容如下: ```ini # 是否显示托盘图标,yes/no trayicon = yes [switch-windows] # 切换窗口的快捷键 hotkey = alt+` # 忽略的应用程序列表 blacklist = # 是否忽略最小化的窗口 ignore_minimal = no # 是否只在当前虚拟桌面切换:yes/no/auto only_current_desktop = auto [switch-apps] # 是否启用应用切换功能 enable = no # 切换应用的快捷键 hotkey = alt+tab # 是否忽略最小化的窗口 ignore_minimal = no # 是否只在当前虚拟桌面切换应用:yes/no/auto only_current_desktop = auto ``` 修改后需要重启 Window-Switcher 才能生效。 ## 管理员权限问题 正常情况下,Window-Switcher 在普通用户模式下工作得很好,但是如果你想要它能管理以管理员模式运行的应用程序,你需要以管理员模式运行 Window-Switcher。 > 提示:如果你设置了开机启动,而且想要它以管理员模式启动,记得先以管理员模式运行它,然后再启用开机启动功能。 ## 总结 自从用上 Window-Switcher,我的工作效率提高了不少,特别是在处理大量窗口的时候。对于像我这样经常需要在多个窗口之间切换的人来说,这个小工具简直是救星!强烈推荐大家试试! 如果你也想尝试,可以前往 [GitHub 页面](https://github.com/sigoden/window-switcher) 了解更多信息。 --- 你们试过类似的工具吗?有什么使用心得可以分享?欢迎在评论区交流!
Android 手机卸载 App 但保留应用数据 作者: Shine 时间: 2025-04-20 分类: Android 评论 比如微信,我是通过国内应用商店安装的,我现在想要安装 Play store 版本的,按照往常可能就需要卸载再安装。 但是我从一些论坛得知其实可以使用 `adb uninstall -k` 命令来卸载 App 但是保留应用数据和缓存。 比如你要卸载微信但是保留应用数据和缓存你就可以这样操作: ```shell adb uninstall -k com.tencent.mm # 如果执行上述命令提示如下内容: # The -k option uninstalls the application while retaining the data/cache. #At the moment, there is no way to remove the remaining data. # You will have to reinstall the application with the same signature, and fully uninstall it. # If you truly wish to continue, execute 'adb shell cmd package uninstall -k'. # 你就执行这个命令: adb shell cmd package uninstall -k com.tencent.mm ``` 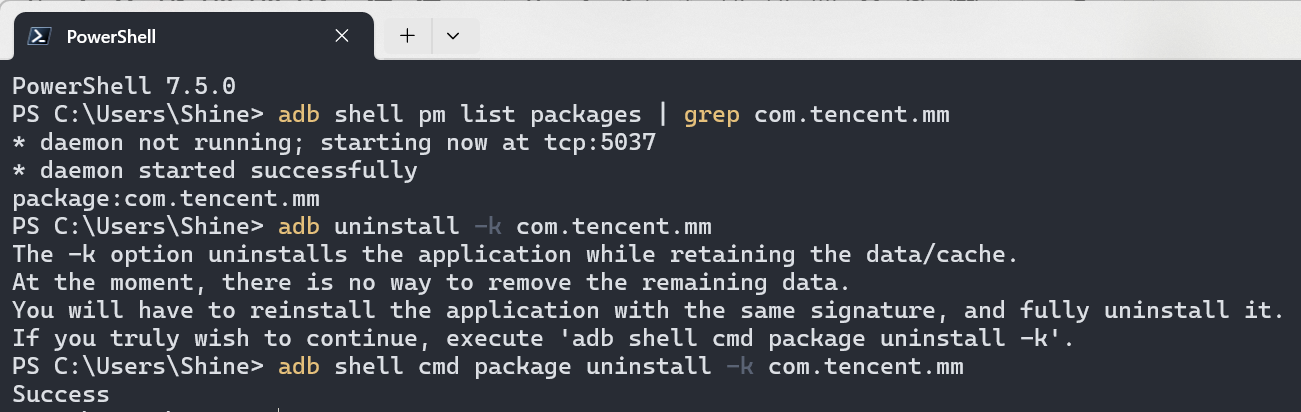 --- **下面的内容通过 LLM 生成** # 使用 `adb uninstall -k` 命令卸载 Android 应用并保留数据 `adb uninstall -k` 是 Android Debug Bridge(ADB)提供的一个命令选项,允许你在卸载应用时保留其本地数据和缓存。本文将详细介绍该命令的作用、适用场景、注意事项及常见问题处理方式。 --- ## 📌 命令格式 ```bash adb uninstall -k <包名> ``` - `-k`:表示在卸载 APK 时 **保留应用的用户数据和缓存目录**,如: - `/data/data/<包名>` - `/sdcard/Android/data/<包名>` --- ## ✅ 使用示例 以微信(WeChat)为例,其包名为 `com.tencent.mm`,执行以下命令可卸载微信 APK 但保留用户数据: ```bash adb uninstall -k com.tencent.mm ``` 卸载后,再次安装相同包名和签名的应用时,原有数据将会被保留和恢复。 --- ## 🧠 应用场景 - 在调试或测试应用时,希望**保留登录信息、配置文件或缓存数据**; - 想通过重新安装 App 来修复某些问题,但又不想让用户数据丢失; - 在自动化测试或 CI/CD 脚本中清除 APK,但保留状态。 --- ## ⚠️ 注意事项 ### 1. 无法删除保留的数据 当使用 `-k` 参数时,系统保留了 `/data/data/<包名>` 等目录。如果你之后无法重新安装具有**相同签名**的应用,可能会导致这些数据**变成系统残留垃圾**,也**无法通过 ADB 再次删除**。 ### 2. 签名不一致将无法复用数据 你需要使用**相同签名的 APK**重新安装,才能正常访问旧数据。不同签名的版本(如 debug 签名与 release 签名)无法读取原有数据。 ### 3. 系统提示信息 执行 `adb uninstall -k` 后,可能会看到如下提示: ``` The -k option uninstalls the application while retaining the data/cache. At the moment, there is no way to remove the remaining data. You will have to reinstall the application with the same signature, and fully uninstall it. If you truly wish to continue, execute 'adb shell cmd package uninstall -k'. ``` > 这是在提醒你:一旦卸载后签名不同,保留的数据将无法删除或复用。 --- ## 🛠️ 替代命令(推荐) 官方推荐使用更底层的 `cmd package` 命令来保留数据: ```bash adb shell cmd package uninstall -k <包名> ``` 示例: ```bash adb shell cmd package uninstall -k com.tencent.mm ``` 该命令作用与 `adb uninstall -k` 相同,但更加直接调用了系统的 `PackageManagerService`。 --- ## 🧹 完全清除数据的卸载方式 如果你想彻底卸载应用及其所有数据: ```bash adb uninstall <包名> ``` 示例: ```bash adb uninstall com.tencent.mm ``` 此操作将删除 APK 文件以及所有相关数据。 --- ## 📂 检查残留数据 可通过以下命令检查某个应用是否还有保留数据: ```bash adb shell ls /data/data/<包名> adb shell ls /sdcard/Android/data/<包名> ``` --- ## 📝 总结 | 目标 | 命令 | |---------------------------|-----------------------------------------------------------| | 卸载 APK 并保留数据 | `adb uninstall -k <包名>` 或 `adb shell cmd package uninstall -k <包名>` | | 卸载 APK 并清除所有数据 | `adb uninstall <包名>` | | 检查是否有数据残留 | `adb shell ls /data/data/<包名>` | --- ## 🙋 常见问题解答 ### Q: 使用 `-k` 卸载后,无法再次安装应用,提示签名冲突? A: 请确保你使用的 APK 与原版本签名一致,或者先使用 `adb uninstall <包名>` 清除数据后再安装。 ### Q: 使用 `-k` 卸载后,怎么彻底删除保留的数据? A: 只能重新安装相同签名的 APK 后,使用 `adb uninstall` 来完整卸载清除所有数据。
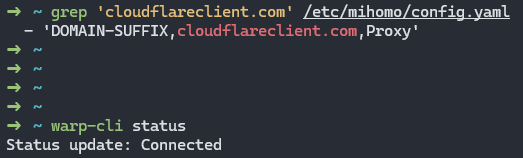
Linux WARP CLI 一直连接不上原因 作者: Shine 时间: 2025-04-15 分类: 谈天说地 评论 Warp CLI 连接需要使用代理如 Clash 并开启 TUN 模式,就会劫持相应的的流量,从而连接上 WARP 节点 最近可能是修改过相关规则,导致一直无法连接很郁闷,然后经过不断排查,终于发现问题,原来是 `cloudflareclient.com` 走了直连导致一直连接不上服务器 最终添加 Clash 规则解决: ```yaml rules: - 'DOMAIN-SUFFIX,cloudflareclient.com,Proxy' ```