为 ip.NowTool.cn 代码进行了优化 作者: Shine 时间: 2021-08-14 分类: PHP,唠嗑闲聊 评论 ## ip.NowTool.cn 这个网站是我去年(2020年11月)左右学习 `Laravel` 框架所做的项目,主要亮点就是 - IPv6 地址精确查询,精确到 区/县,准确度比较高 - 支持对域名多解析 IP 结果展示 - 默认展示的是以你的 IP 地址进行解析的域名,返回最佳的结果 ## 优化项 1. 对 主机名 查询的 DNS 由 8.8.8.8 换成国内的,后续考虑本机自建 DNS,使用 DOT、DOH 查询。并对主机名查询结果进行了缓存,缓存 10 分钟,首页进入效率大大提升。 > 因为我发现耗时操作部分消耗在了这里 2. 对查询结果的 IPv4、IPv6 地址等信息进行缓存,缓存时间 10 天,因为基础数据库不会经常更新,所以设置缓存 10 天 3. 将 PHP 版本升级为 8.0,并添加 `opcache` 缓存扩展 ## 对报错的处理 看了下报错,主要是 DNS 查询结果判断问题,造成判断类型不同导致报错从而出现 500(比较频繁) 还有就是对其他方面加强异常捕获 ——2021年8月14日 星期六 01:58 
WordPress 使用 wp 命令创建 .opt 文件用以支持多语言 作者: Shine 时间: 2021-07-20 分类: PHP 评论 ## 前言 > 个人所理解,如有错误请指正 首先需要明白一件事情,创建 `.opt` 文件前,首先在你的插件注释里添加以下关键注释(**Text Domain** 和 **Domain Path** 字段): - **Text Domain**:文本域(个人理解),这个比较关键 - **Domain Path**:翻译文件存放的路径 ``` /** * Plugin Name: 插件的名字 * Plugin URI: https://nowtime.cc/ * Description: 插件简介 * Version: 0.0.1 * Author: Chuwen * Author URI: https://nowtime.cc * Text Domain: chuwen * Domain Path: /i18n/languages/ * Requires at least: 5.5 * Requires PHP: 7.0 * * @package Chuwen * @date 2021/7/20 14:50 */ ``` 以上工作完成后,就可以接着往下看了 ## 安装 wp 命令 > WP-CLI 是一款用于管理 WordPress 的命令行交互界面,无需浏览器即可完成插件更新,多站点设置等许多操作。 官网地址:https://wp-cli.org/zh-cn/ [官方]安装文档:[https://wp-cli.org/zh-cn/#安装](https://wp-cli.org/zh-cn/#安装 "https://wp-cli.org/zh-cn/#安装") ### 本文主要介绍 macOS 以及 Linux 系统安装 #### Linux 安装教程 ```shell cd ~ curl -O https://raw.githubusercontent.com/wp-cli/builds/gh-pages/phar/wp-cli.phar # 检查 Phar 文件确保其正常运行: php wp-cli.phar --info # 要使用 wp 执行 WP-CLI 命令,必须有执行权限并且 PATH 已在环境变量中注册,例如: chmod +x wp-cli.phar sudo mv wp-cli.phar /usr/local/bin/wp # 最后再次验证 wp --info ``` #### macOS 可以借助 Homebrew 进行安装 > Homebrew 官方安装文档:https://docs.brew.sh/Installation > 其安装教程可参照:https://zhuanlan.zhihu.com/p/111014448 Homebrew 安装完成后,执行 `brew install wp-cli` 即可 #### Windows 安装教程 > 自行网上搜索,因为**某些功能在 Windows 中将受到限制**,所以我推荐在 Windows 10 以及以上的系统,安装 WSL(Windows 子系统),然后参照 Linux 系统安装 `wp` 命令即可 ### 验证安装 wp 命令 输入 `wp --info` 即可验证 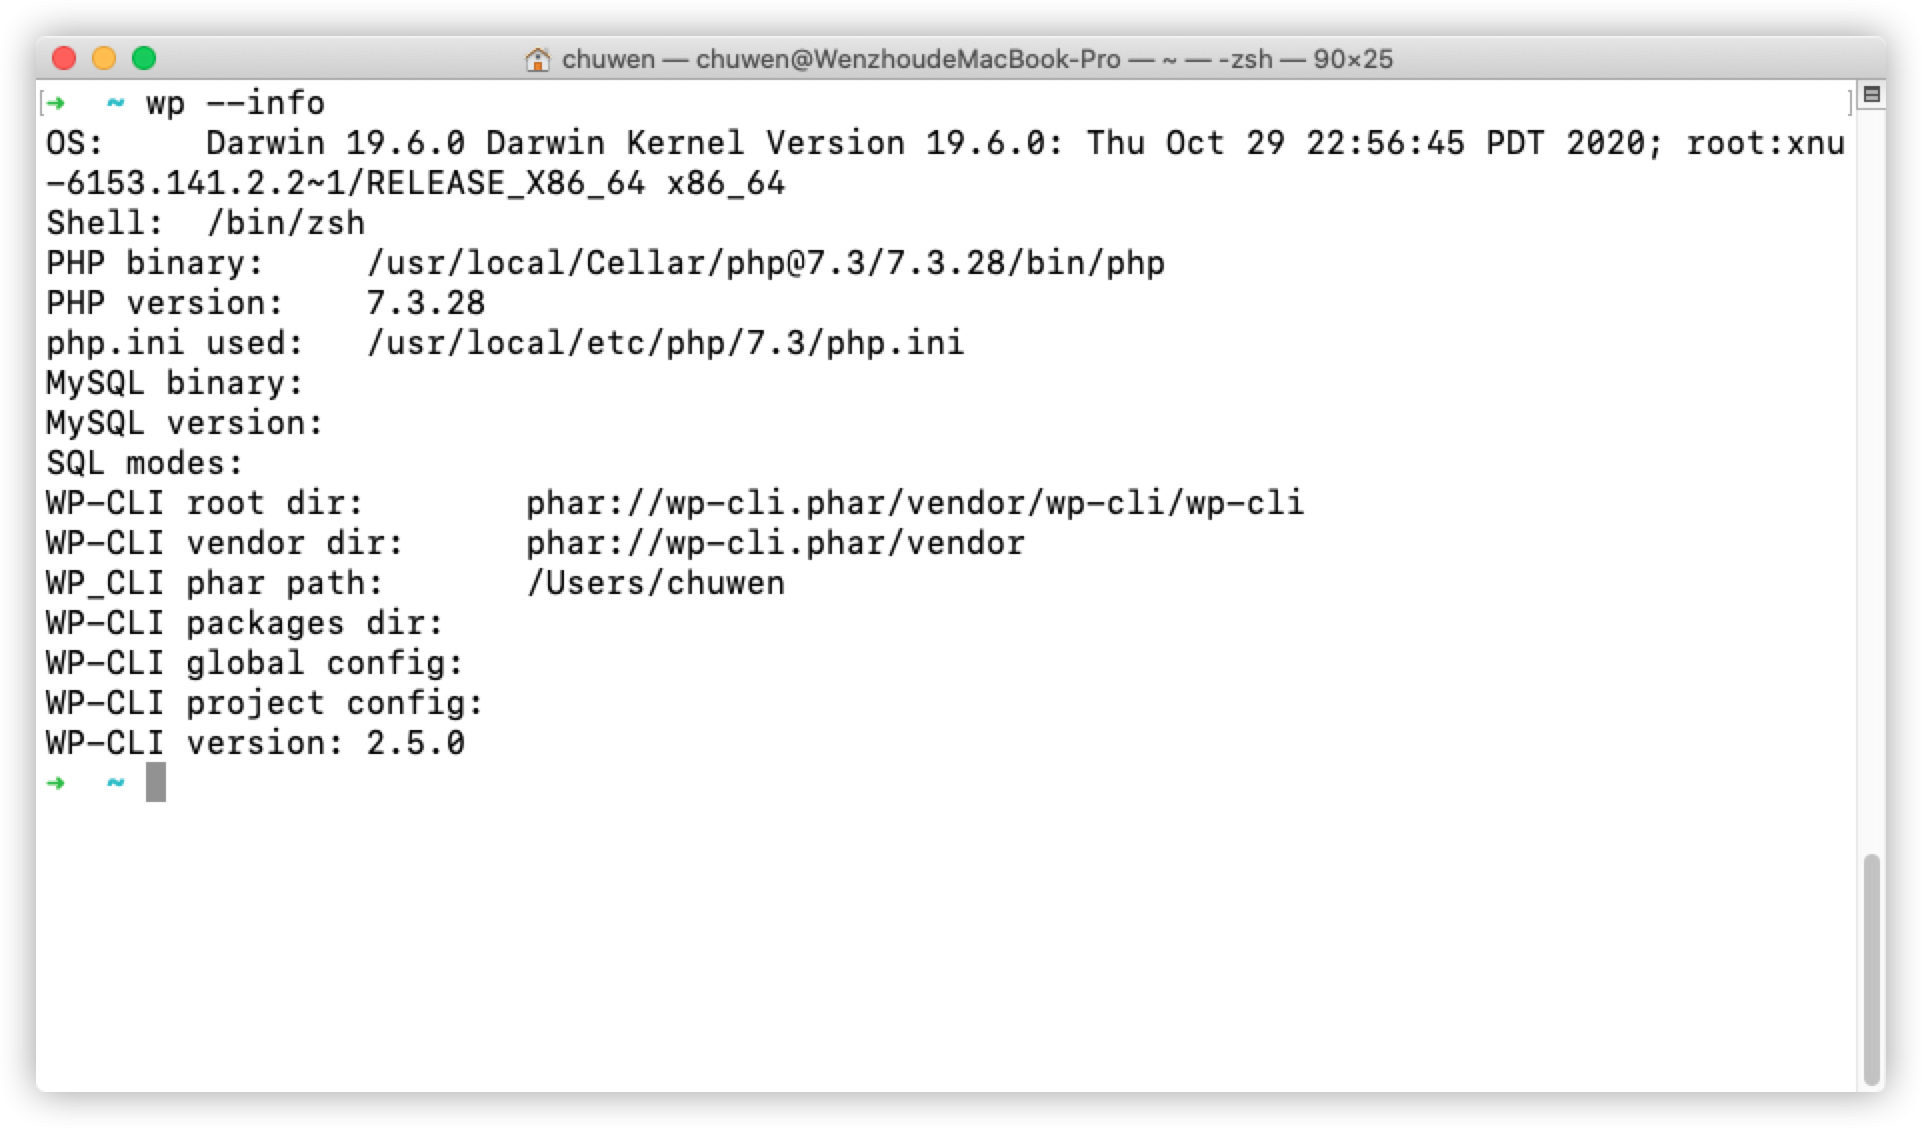 ```shell chuwen@MiBook# wp --info OS: Darwin 19.6.0 Darwin Kernel Version 19.6.0: Thu Oct 29 22:56:45 PDT 2020; root:xnu-6153.141.2.2~1/RELEASE_X86_64 x86_64 Shell: /bin/zsh PHP binary: /usr/local/Cellar/php@7.3/7.3.28/bin/php PHP version: 7.3.28 php.ini used: /usr/local/etc/php/7.3/php.ini MySQL binary: MySQL version: SQL modes: WP-CLI root dir: phar://wp-cli.phar/vendor/wp-cli/wp-cli WP-CLI vendor dir: phar://wp-cli.phar/vendor WP_CLI phar path: /Users/chuwen WP-CLI packages dir: WP-CLI global config: WP-CLI project config: WP-CLI version: 2.5.0 ``` ## 生成 `.pot` 文件 - 假设你的 WordPress 根目录是:`/www/wwwroot/wordpress.com` - 假设你的 WordPress 插件目录:`/www/wwwroot/wordpress.com/wp-content/plugins/chuwen` 首先进入的你的**插件目录** ```shell cd /www/wwwroot/wordpress.com/wp-content/plugins/chuwen ``` 然后生成 `.opt` 文件 ```shell # 如果你是按照最开头的做法做的,那么会自动将生成的 `.opt` 文件放到 `Domain Path` 文件夹下 wp i18n make-pot . # 如果你想指定文件存放路径、文件名 wp i18n make-pot . i18n/languages/chuwen.pot ``` 最后生成结果查看你插件目录下的 `i18n/languages/` 里面的文件即可 ### 生成多语言 将生成的比如 `chuwen.pot` 复制一份,将其命名为 `en_US.pot`,然后使用工具进行翻译即可
WordPress 使用 CloudFlare 后,后台无法进入、重定向次数过多、提示 Sorry, you are not allowed to access this page. 作者: Shine 时间: 2021-07-10 分类: PHP 评论 ## 具体原因 1. CloudFlare 那边 SSL 配置的是“灵活” 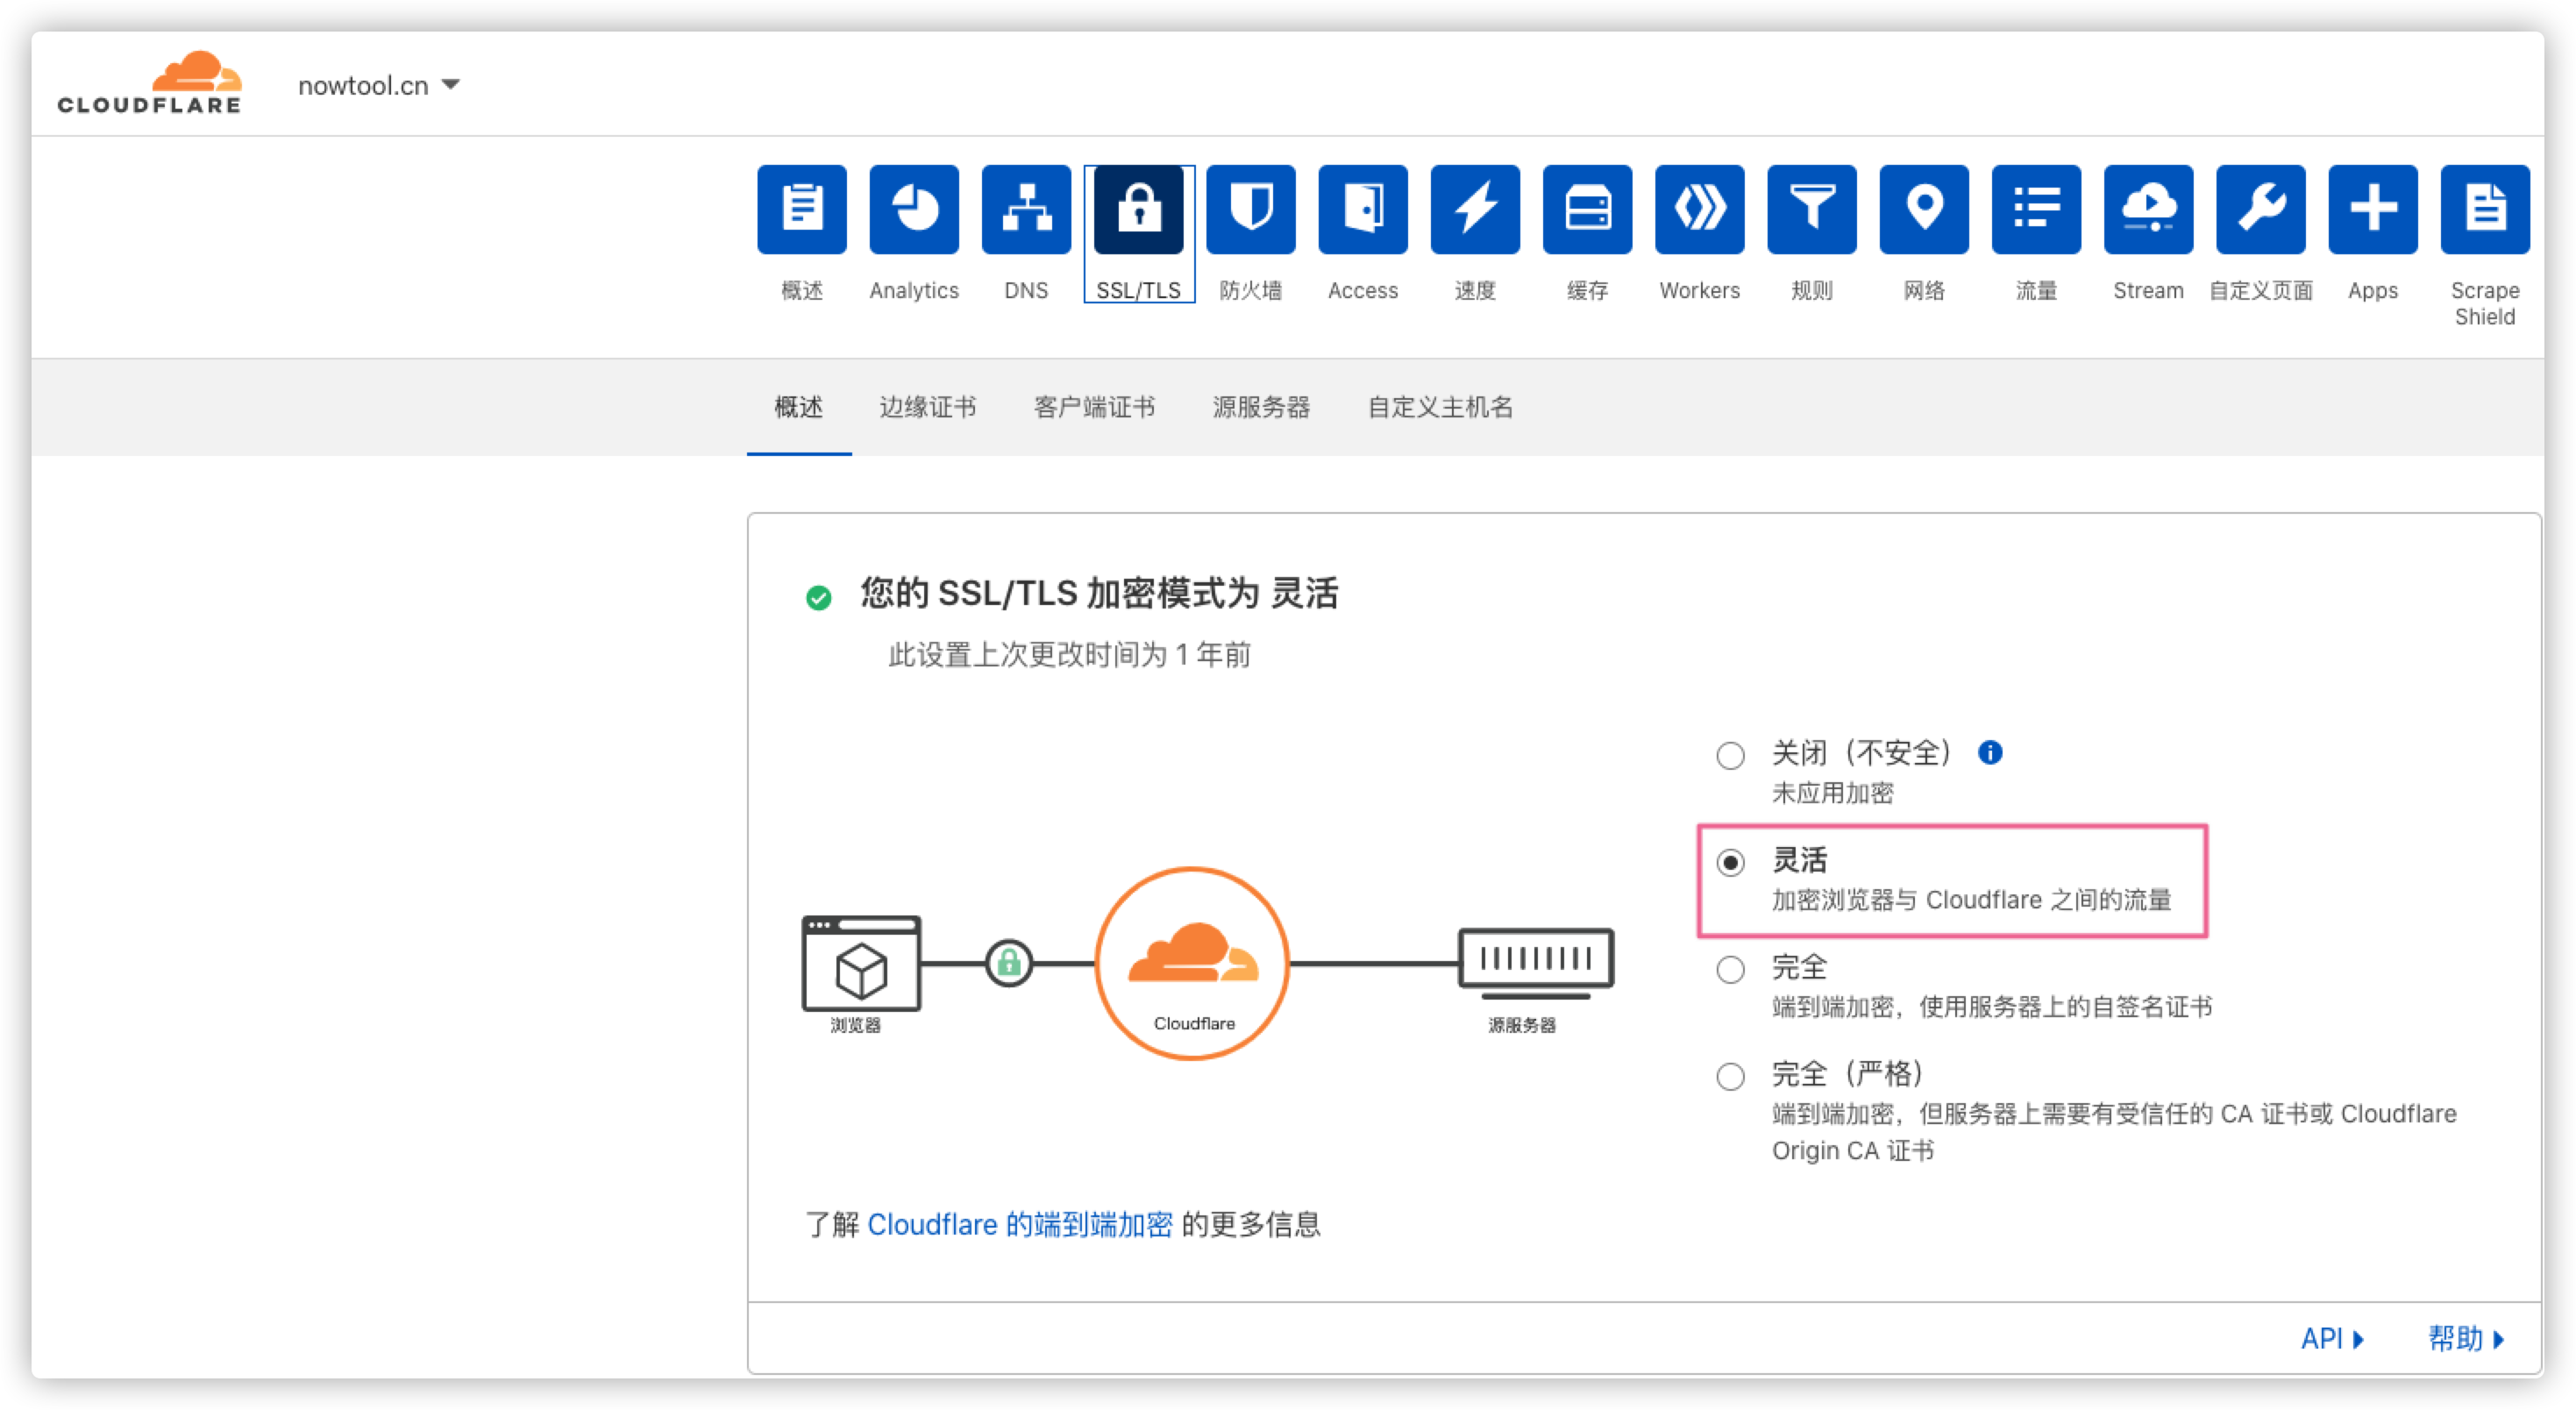 2. WordPress 后台配置的又是 https 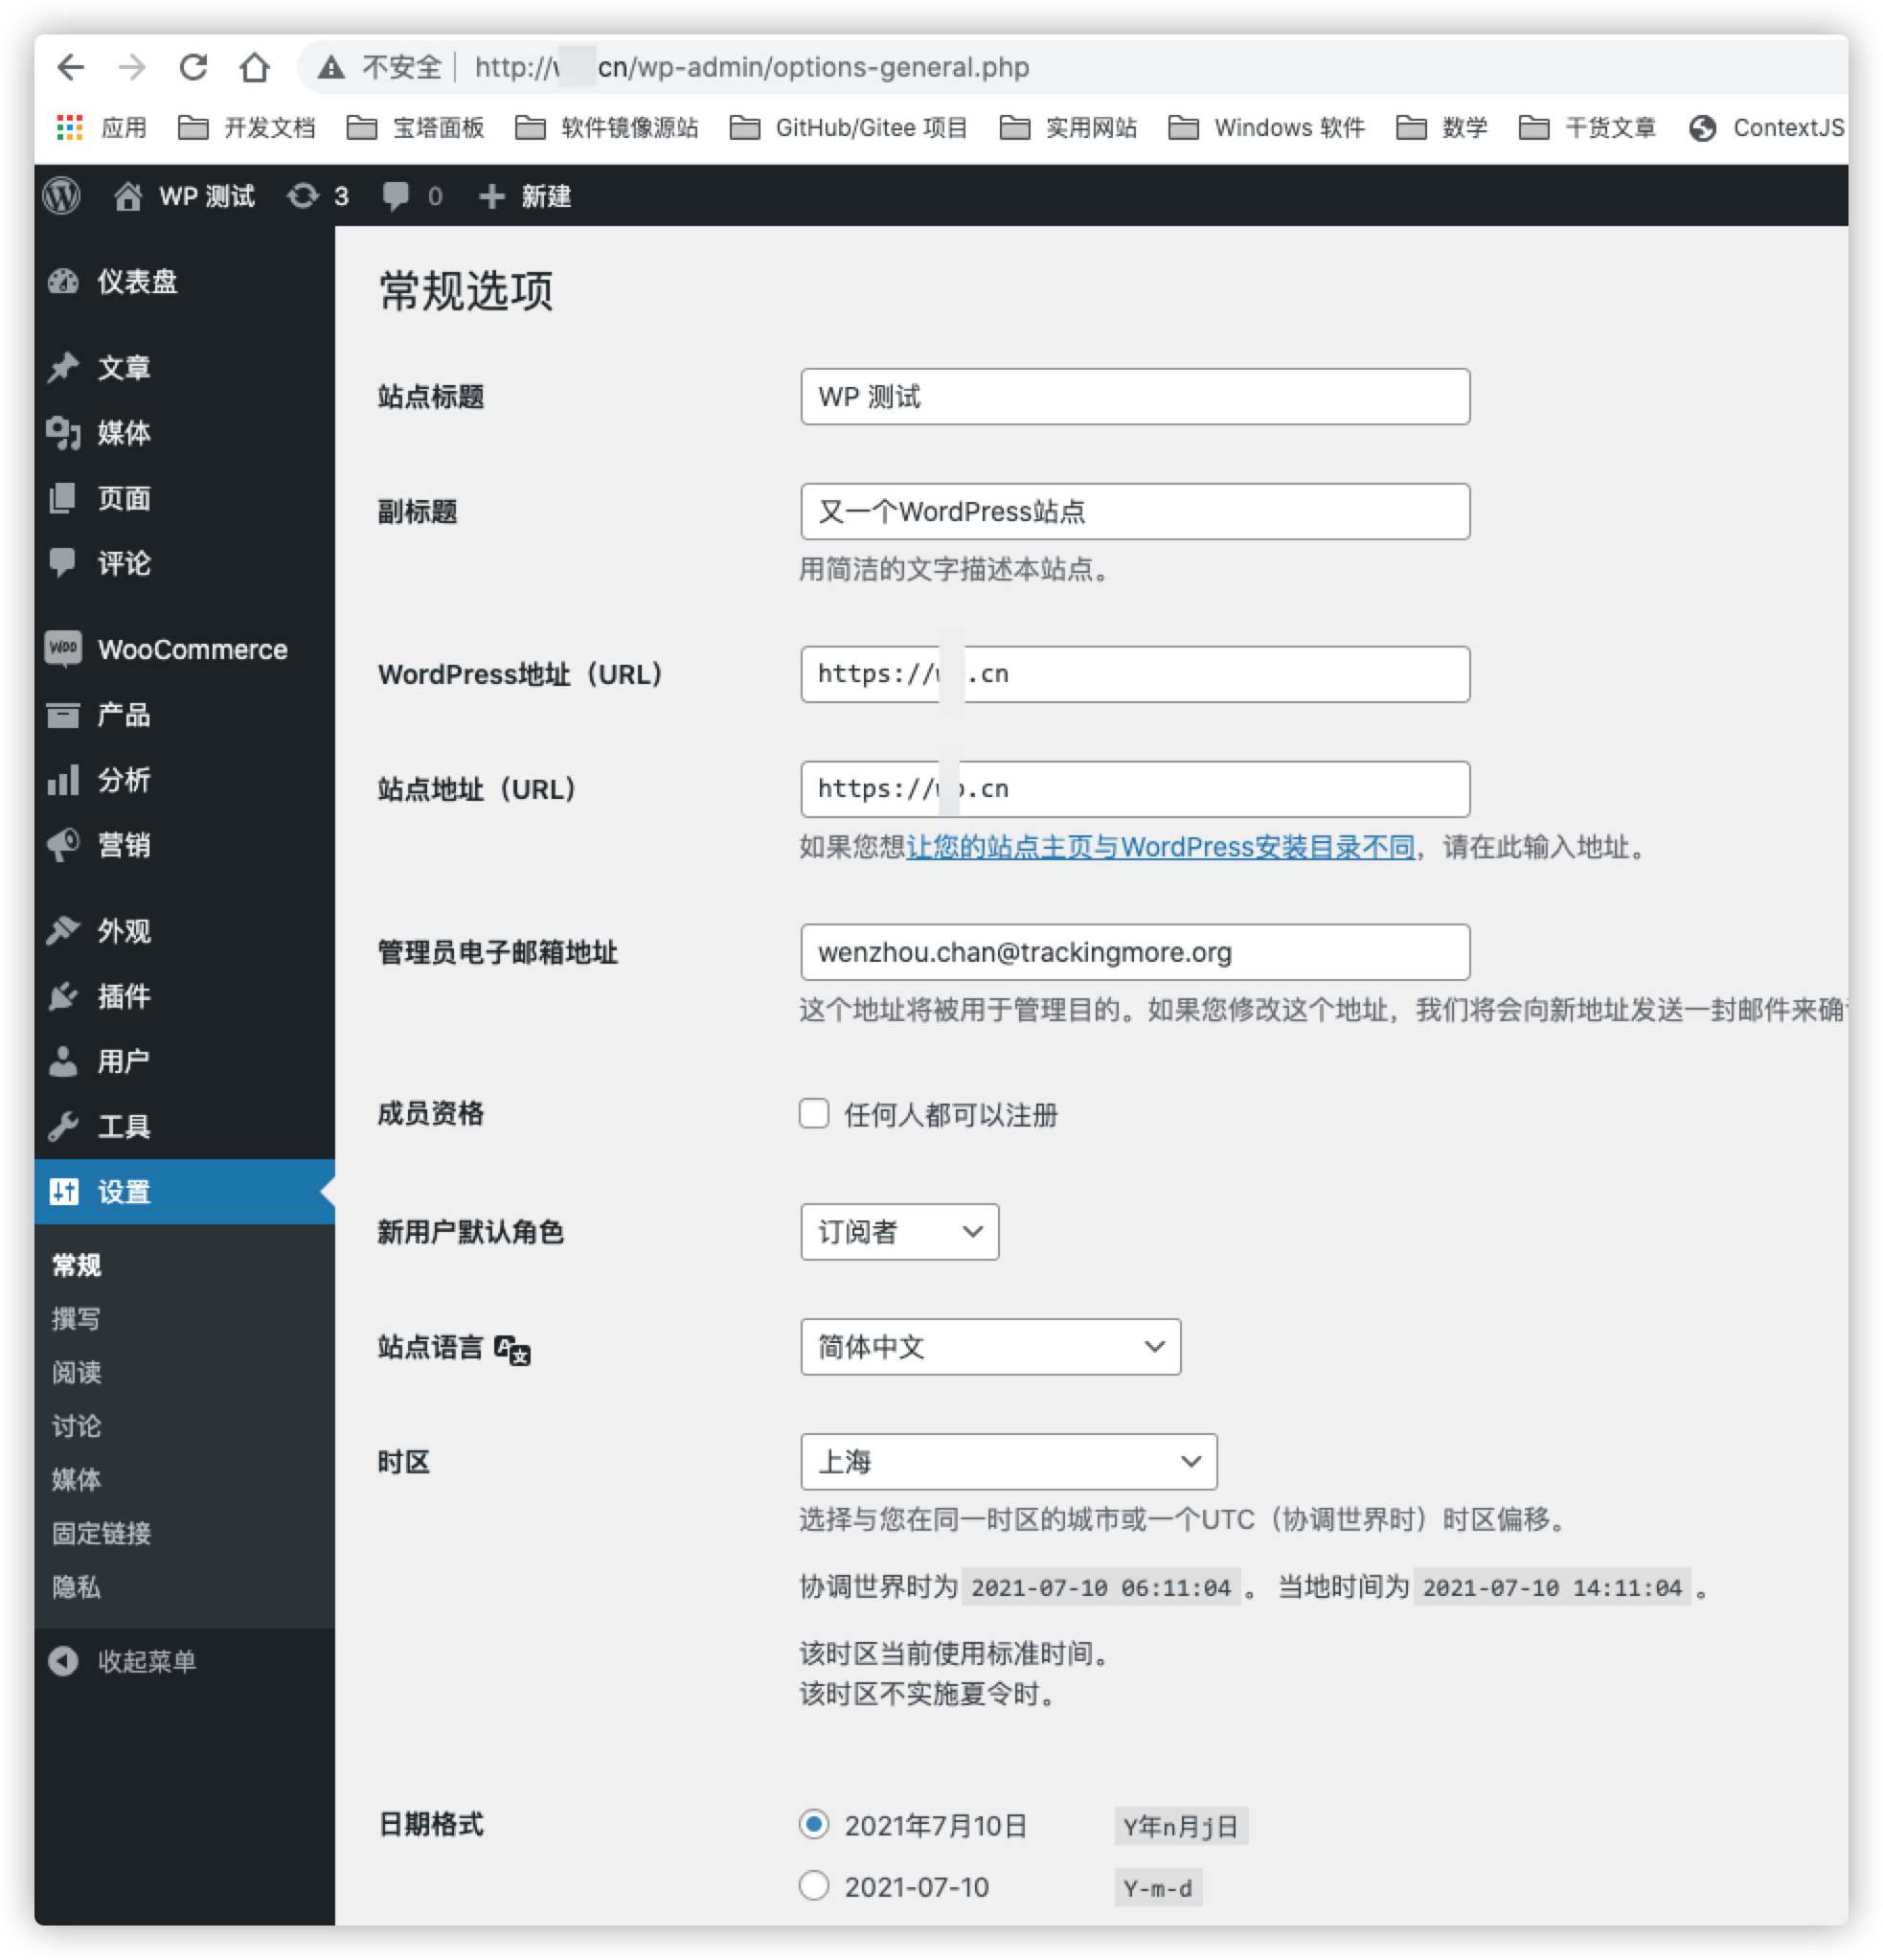 最终就会导致浏览器一直报“重定向次数过多”,或者 WordPress 直接报 `Sorry, you are not allowed to access this page.` CloudFlare SSL 配置“灵活”,指的是 **源站**(也就是你的 WordPress)博客不支持 https,然后 CloudFlare 可以实现: 浏览器 --https--> CloudFlare --http--> 你的服务器(WordPress) **但是**,你在 WordPress 后台配置的了你的 WordPress 地址是 `https` 地址开头的,所以当 CloudFlare 访问你的 WordPress 时,你的 WordPress 告诉 CloudFlare 你只能通过 https 访问,CloudFlare 又告诉你的浏览器你只能访问 https 这样就造成了循环.... ## 解决办法 将 CloudFlare 的 SSL 配置改为“完全”或“完全(严格)”,**推荐选择完全**具体看: 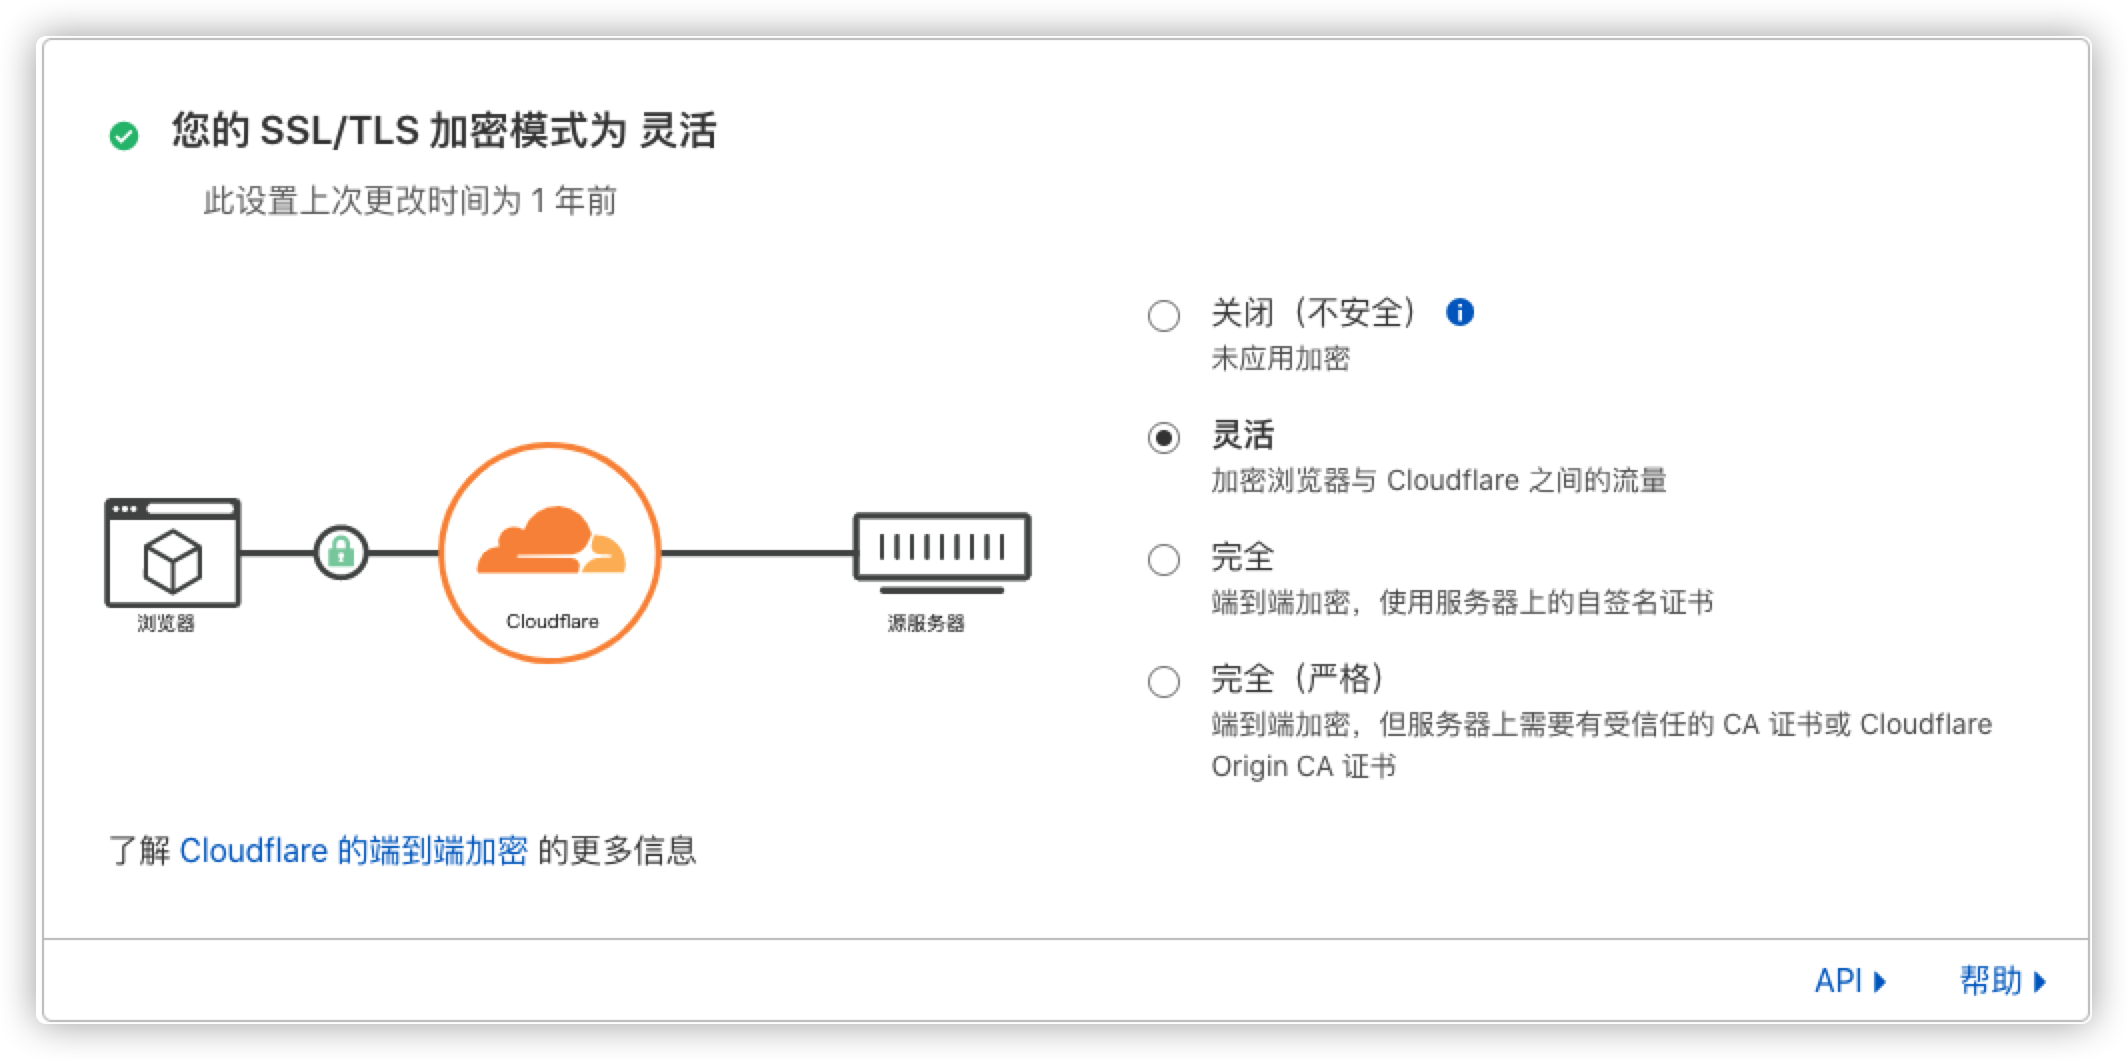
目录/时间线 Typecho 自定义模板 作者: Shine 时间: 2021-07-04 分类: PHP 1 条评论 ## 使用说明 如果你使用的是 Typecho 默认主题,那么你可以在你博客目录下 `/www/wwwroot/nowtime.cc/usr/themes/default` 新建一个文件名为 `time-line.php` 然后将下述**模板源码**粘贴进去保存 > 其它主题可以参照着你主题目录下的 `page.php` 源码来修改我下面写的**模板源码** 然后去博客后台 -> 管理 -> 独立页面 -> 新增,选择模板 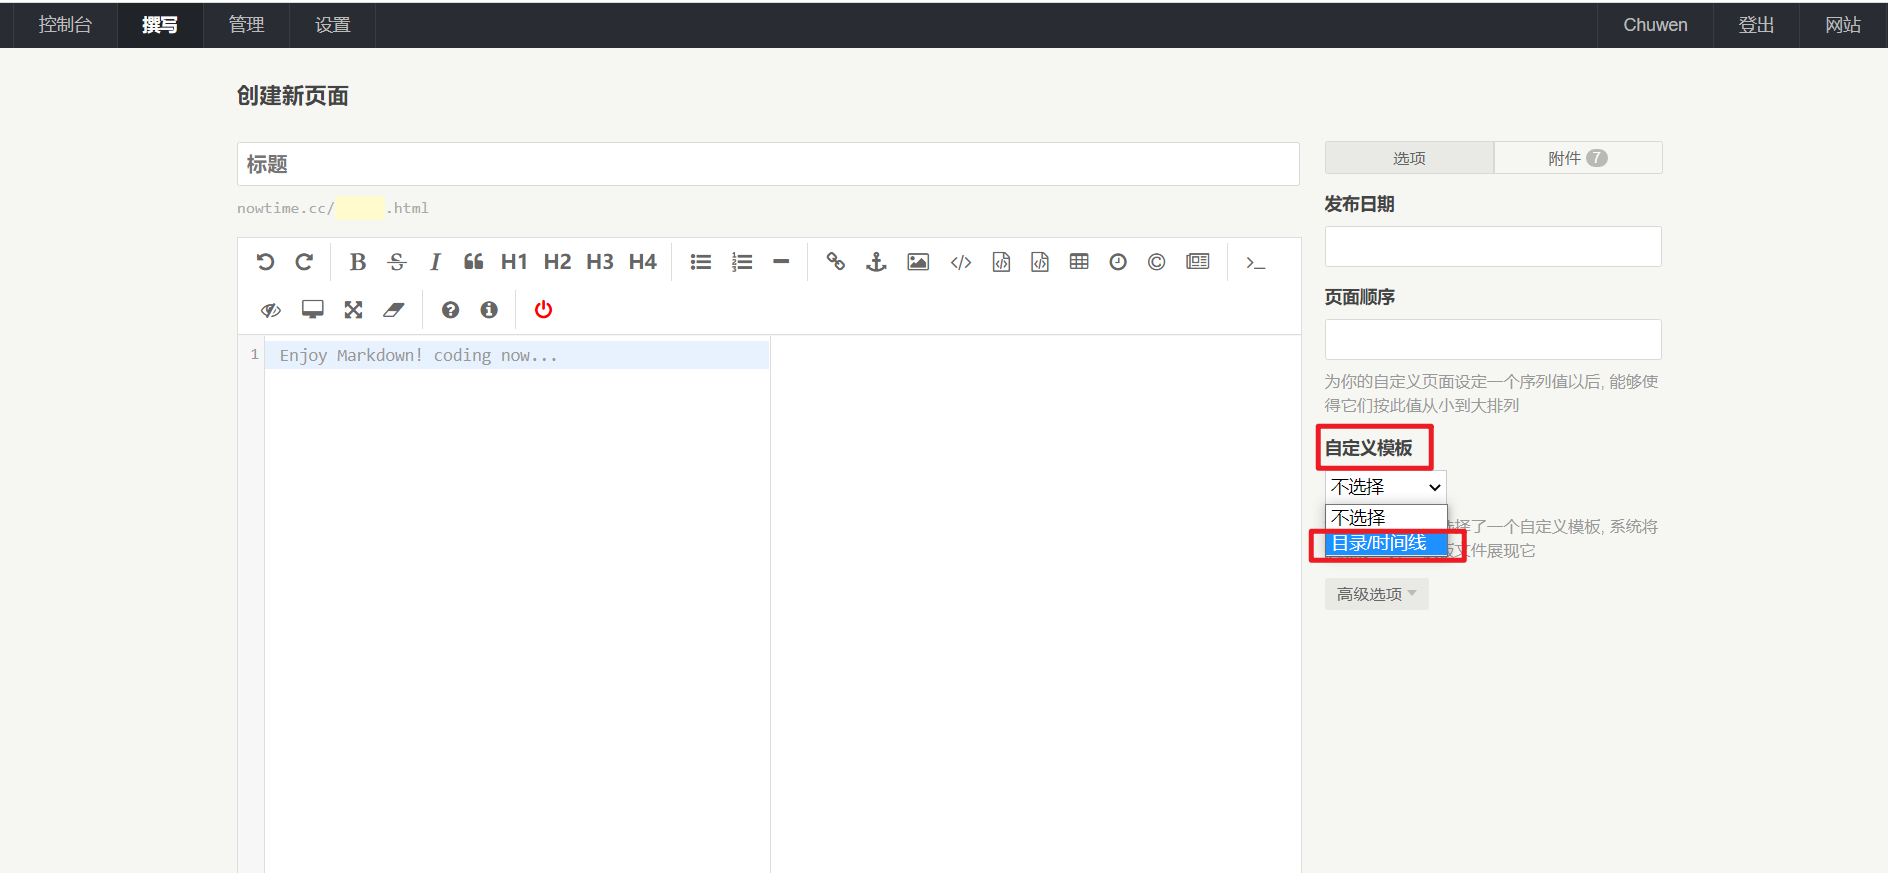 然后“发布页面即可” ### 效果预览 https://nowtime.cc/time-line.html 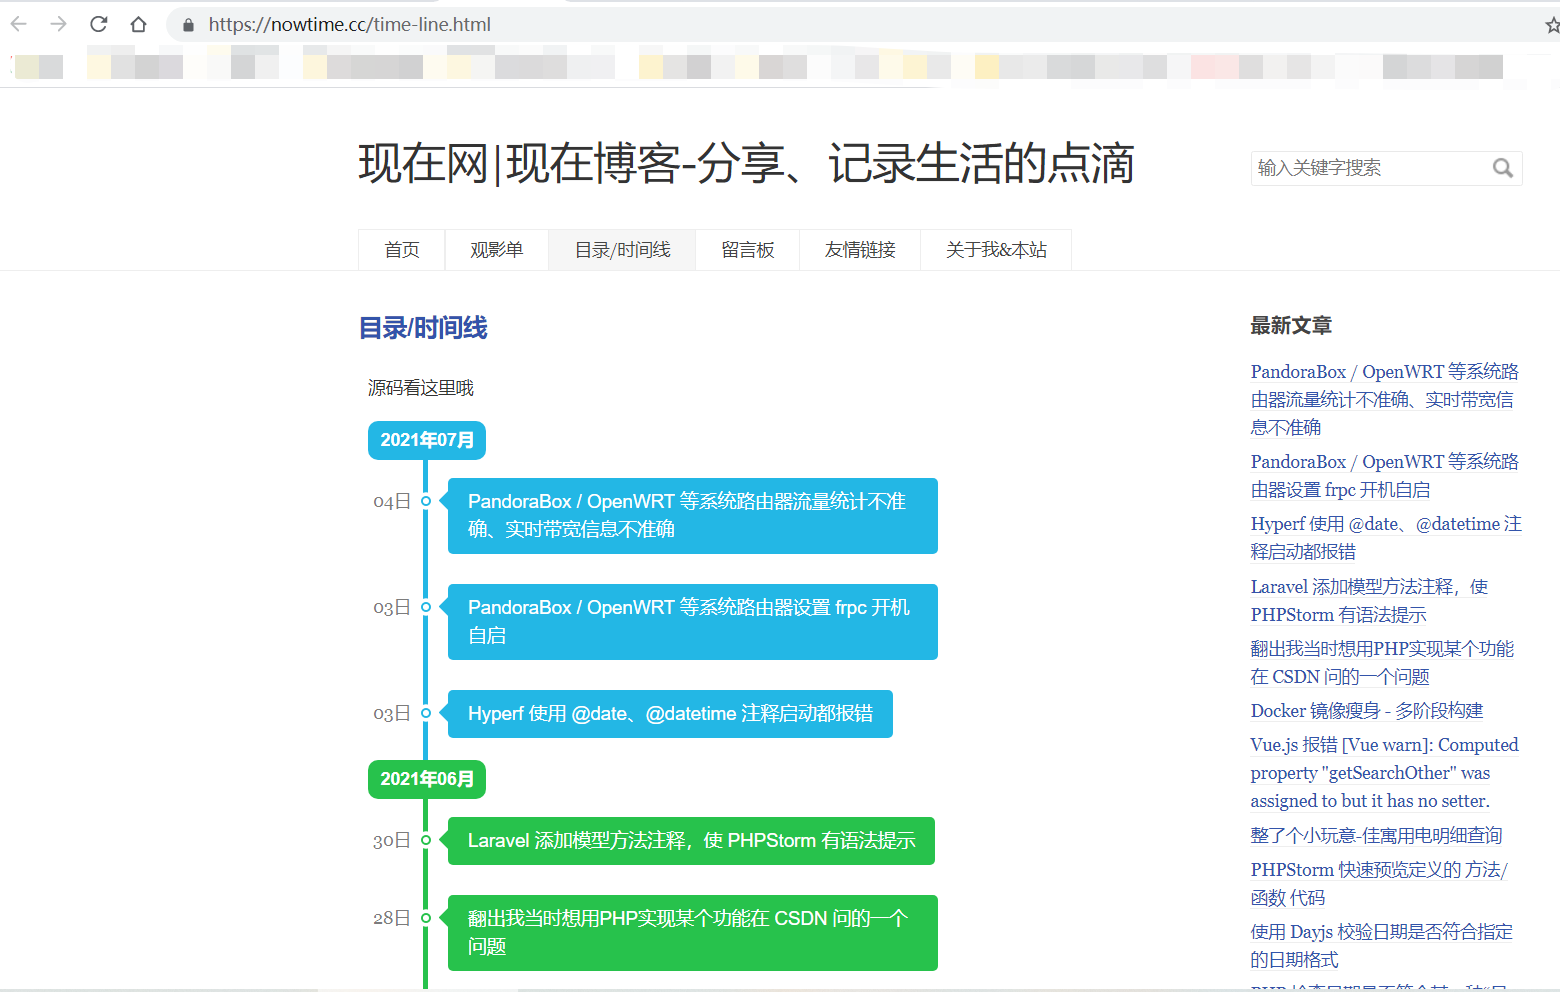 ## 模板源码 ```php <?php /** * 目录/时间线 * * @package custom */ ?> <?php if (!defined('__TYPECHO_ROOT_DIR__')) exit; ?> <?php $this->need('header.php'); ?> <style> .time-line li{list-style-type:none} .time-line .tl-header{margin:8px;cursor:pointer} .time-line .tl-header:hover{-webkit-filter:brightness(.9)} .time-line .tl-header{margin:8px;background-color:#23b7e5;color:#fff;text-align:center;display:inline-block;padding:0 10px;border-radius:8px} .time-line .tl-header h2{font-size:14px;line-height:8px} .time-line .tl-body{border-left:4px solid #23b7e5;margin-left:52px;min-height:88px;margin-top:-10px;padding-top:1px;margin-bottom:-8px;position:relative;padding-bottom:1px} .time-line .tl-body span{position:absolute;left:-60px;top:16px;font-weight:400;font-size:14px;opacity:.7} .time-line .tl-body li{display:block;position:relative;left:-24px;margin:8px 0} .time-line .tl-body li:before{position:absolute;content:"";top:22px;left:-22px;width:4px;height:4px;background:#fff;border:2px solid #23b7e5;border-radius:50%;box-shadow:0 0 0 3px #fff} .time-line .tl-body li h3{font-size:15px;background-color:#23b7e5;display:inline-block;margin:8px 0;padding:8px 16px;border-radius:4px;font-weight:400;max-width:360px} .time-line .tl-body li h3:before{content:"";position:absolute;z-index:-1;left:-8px;border:10px solid transparent;border-right-color:#23b7e5;border-left:0} .time-line .tl-body li a{text-decoration:none;color:#fff;border-bottom:none;} .time-line .tl-body li a:hover{border-bottom: 1px solid #EEE;} .tl-header.start{position:relative;left:18px;background:#fff!important;border-color:#dee5e7;border-bottom-color:#d8e1e3;-webkit-box-shadow:0 1px 1px rgba(90,90,90,.1);box-shadow:0 1px 1px rgba(90,90,90,.1);color:#000;padding:0 16px} .tl-header.start>h2{font-weight:500} .time-line .tl-header:nth-child(7n+2),.time-line .tl-header:nth-child(7n+2)+.tl-body h3{background:#fad733} .time-line .tl-header:nth-child(7n+2)+.tl-body{border-left:4px solid #fad733} .time-line .tl-header:nth-child(7n+2)+.tl-body li:before{border-color:#fad733} .time-line .tl-header:nth-child(7n+2)+.tl-body h3:before{border-right-color:#fad733} .time-line .tl-header:nth-child(7n+3),.time-line .tl-header:nth-child(7n+3)+.tl-body h3{background:#27c24c} .time-line .tl-header:nth-child(7n+3)+.tl-body{border-left:4px solid #27c24c} .time-line .tl-header:nth-child(7n+3)+.tl-body li:before{border-color:#27c24c} .time-line .tl-header:nth-child(7n+3)+.tl-body h3:before{border-right-color:#27c24c} .time-line .tl-header:nth-child(7n+4),.time-line .tl-header:nth-child(7n+4)+.tl-body h3{background:#3a3f51} .time-line .tl-header:nth-child(7n+4)+.tl-body{border-left:4px solid #3a3f51} .time-line .tl-header:nth-child(7n+4)+.tl-body li:before{border-color:#3a3f51} .time-line .tl-header:nth-child(7n+4)+.tl-body h3:before{border-right-color:#3a3f51} .time-line .tl-header:nth-child(7n+5),.time-line .tl-header:nth-child(7n+5)+.tl-body h3{background:#1c2b36} .time-line .tl-header:nth-child(7n+5)+.tl-body{border-left:4px solid #1c2b36} .time-line .tl-header:nth-child(7n+5)+.tl-body li:before{border-color:#1c2b36} .time-line .tl-header:nth-child(7n+5)+.tl-body h3:before{border-right-color:#1c2b36} .time-line .tl-header:nth-child(7n+6),.time-line .tl-header:nth-child(7n+6)+.tl-body h3{background:#7266ba} .time-line .tl-header:nth-child(7n+6)+.tl-body{border-left:4px solid #7266ba} .time-line .tl-header:nth-child(7n+6)+.tl-body li:before{border-color:#7266ba} .time-line .tl-header:nth-child(7n+6)+.tl-body h3:before{border-right-color:#7266ba} .time-line .tl-header:nth-child(7n+7),.time-line .tl-header:nth-child(7n+7)+.tl-body h3{background:#f05050} .time-line .tl-header:nth-child(7n+7)+.tl-body{border-left:4px solid #f05050} .time-line .tl-header:nth-child(7n+7)+.tl-body li:before{border-color:#f05050} .time-line .tl-header:nth-child(7n+7)+.tl-body h3:before{border-right-color:#f05050} /*自定义的 CSS 样式*/ .editormd-html-preview, .editormd-preview-container{min-height: 0!important;padding: 8px;} </style> <div class="col-mb-12 col-8" id="main" role="main"> <article class="post" itemscope itemtype="http://schema.org/BlogPosting"> <h1 class="post-title" itemprop="name headline"><a itemprop="url" href="<?php $this->permalink() ?>"><?php $this->title() ?></a></h1> <div class="post-content" itemprop="articleBody"> <?php $this->content(); ?> <!--存放时间线容器--> <div class="time-line"></div> </div> </article> <?php $this->need('comments.php'); ?> </div><!-- end #main--> <?php $this->widget("Widget_Contents_Post_Recent", "pageSize=100000000000000")->to($post); $recentPost = array(); while ($post->next()) { $recentPost[] = array( "title" => $post->title, "link" => $post->permalink, "time" => $post->created, ); } ?> <script> const data = <?php echo json_encode($recentPost); ?> //调用函数,渲染“时间线” xuanran_time_line(data); /** * 渲染时间线 * @param data {[]} 需要进行时间线分割的数据 * @param selector string css 选择器 */ function xuanran_time_line(data = [], selector = ".time-line") { let time_line = document.querySelector(selector); let _group_month = group_month(data), html; time_line.innerHTML = '';//清空时间线 for (let item in _group_month) { html = '<li class="tl-header">\n' + ' <h2>' + item + '</h2>\n' + '</li>' + '<ul class="tl-body">'; for (let items in _group_month[item]) { ttt = _group_month[item][items]; html += '<li>\n' + ' <span>' + time_d(ttt["time"]) + '</span>\n' + ' <h3>\n' + ' <a href="' + ttt["link"] + '" target="_blank">' + ttt["title"] + '</a>\n' + ' </h3>\n' + '</li>\n' } html += '</ul>'; time_line.innerHTML += html; } time_line.innerHTML += '<li class="tl-header start">\n' + ' <h2>开始</h2>\n' + '</li>'; } /** * 按月份分组 * @param data {[]} * @returns {[]} */ function group_month(data) { let result = []; for (let item in data) { date = time_ym(data[item]['time']); if (!result[date]) { result[date] = [data[item]]; } else { result[date].push(data[item]); } } return result; } /** * 时间戳{秒级} 转 年月 * @param dates * @returns {string} */ function time_ym(dates) { let date = new Date(dates * 1000); let Y = date.getFullYear() + '年'; let M = (date.getMonth() + 1 < 10 ? '0' + (date.getMonth() + 1) : date.getMonth() + 1) + '月'; return Y + M; } /** * 时间戳{秒级} 转 日 * @param dates * @returns {string} */ function time_d(dates) { let date = new Date(dates * 1000); return (date.getDate() < 10 ? '0' + (date.getDate()) : date.getDate()) + '日'; } </script> <?php $this->need('sidebar.php'); ?> <?php $this->need('footer.php'); ?> ```
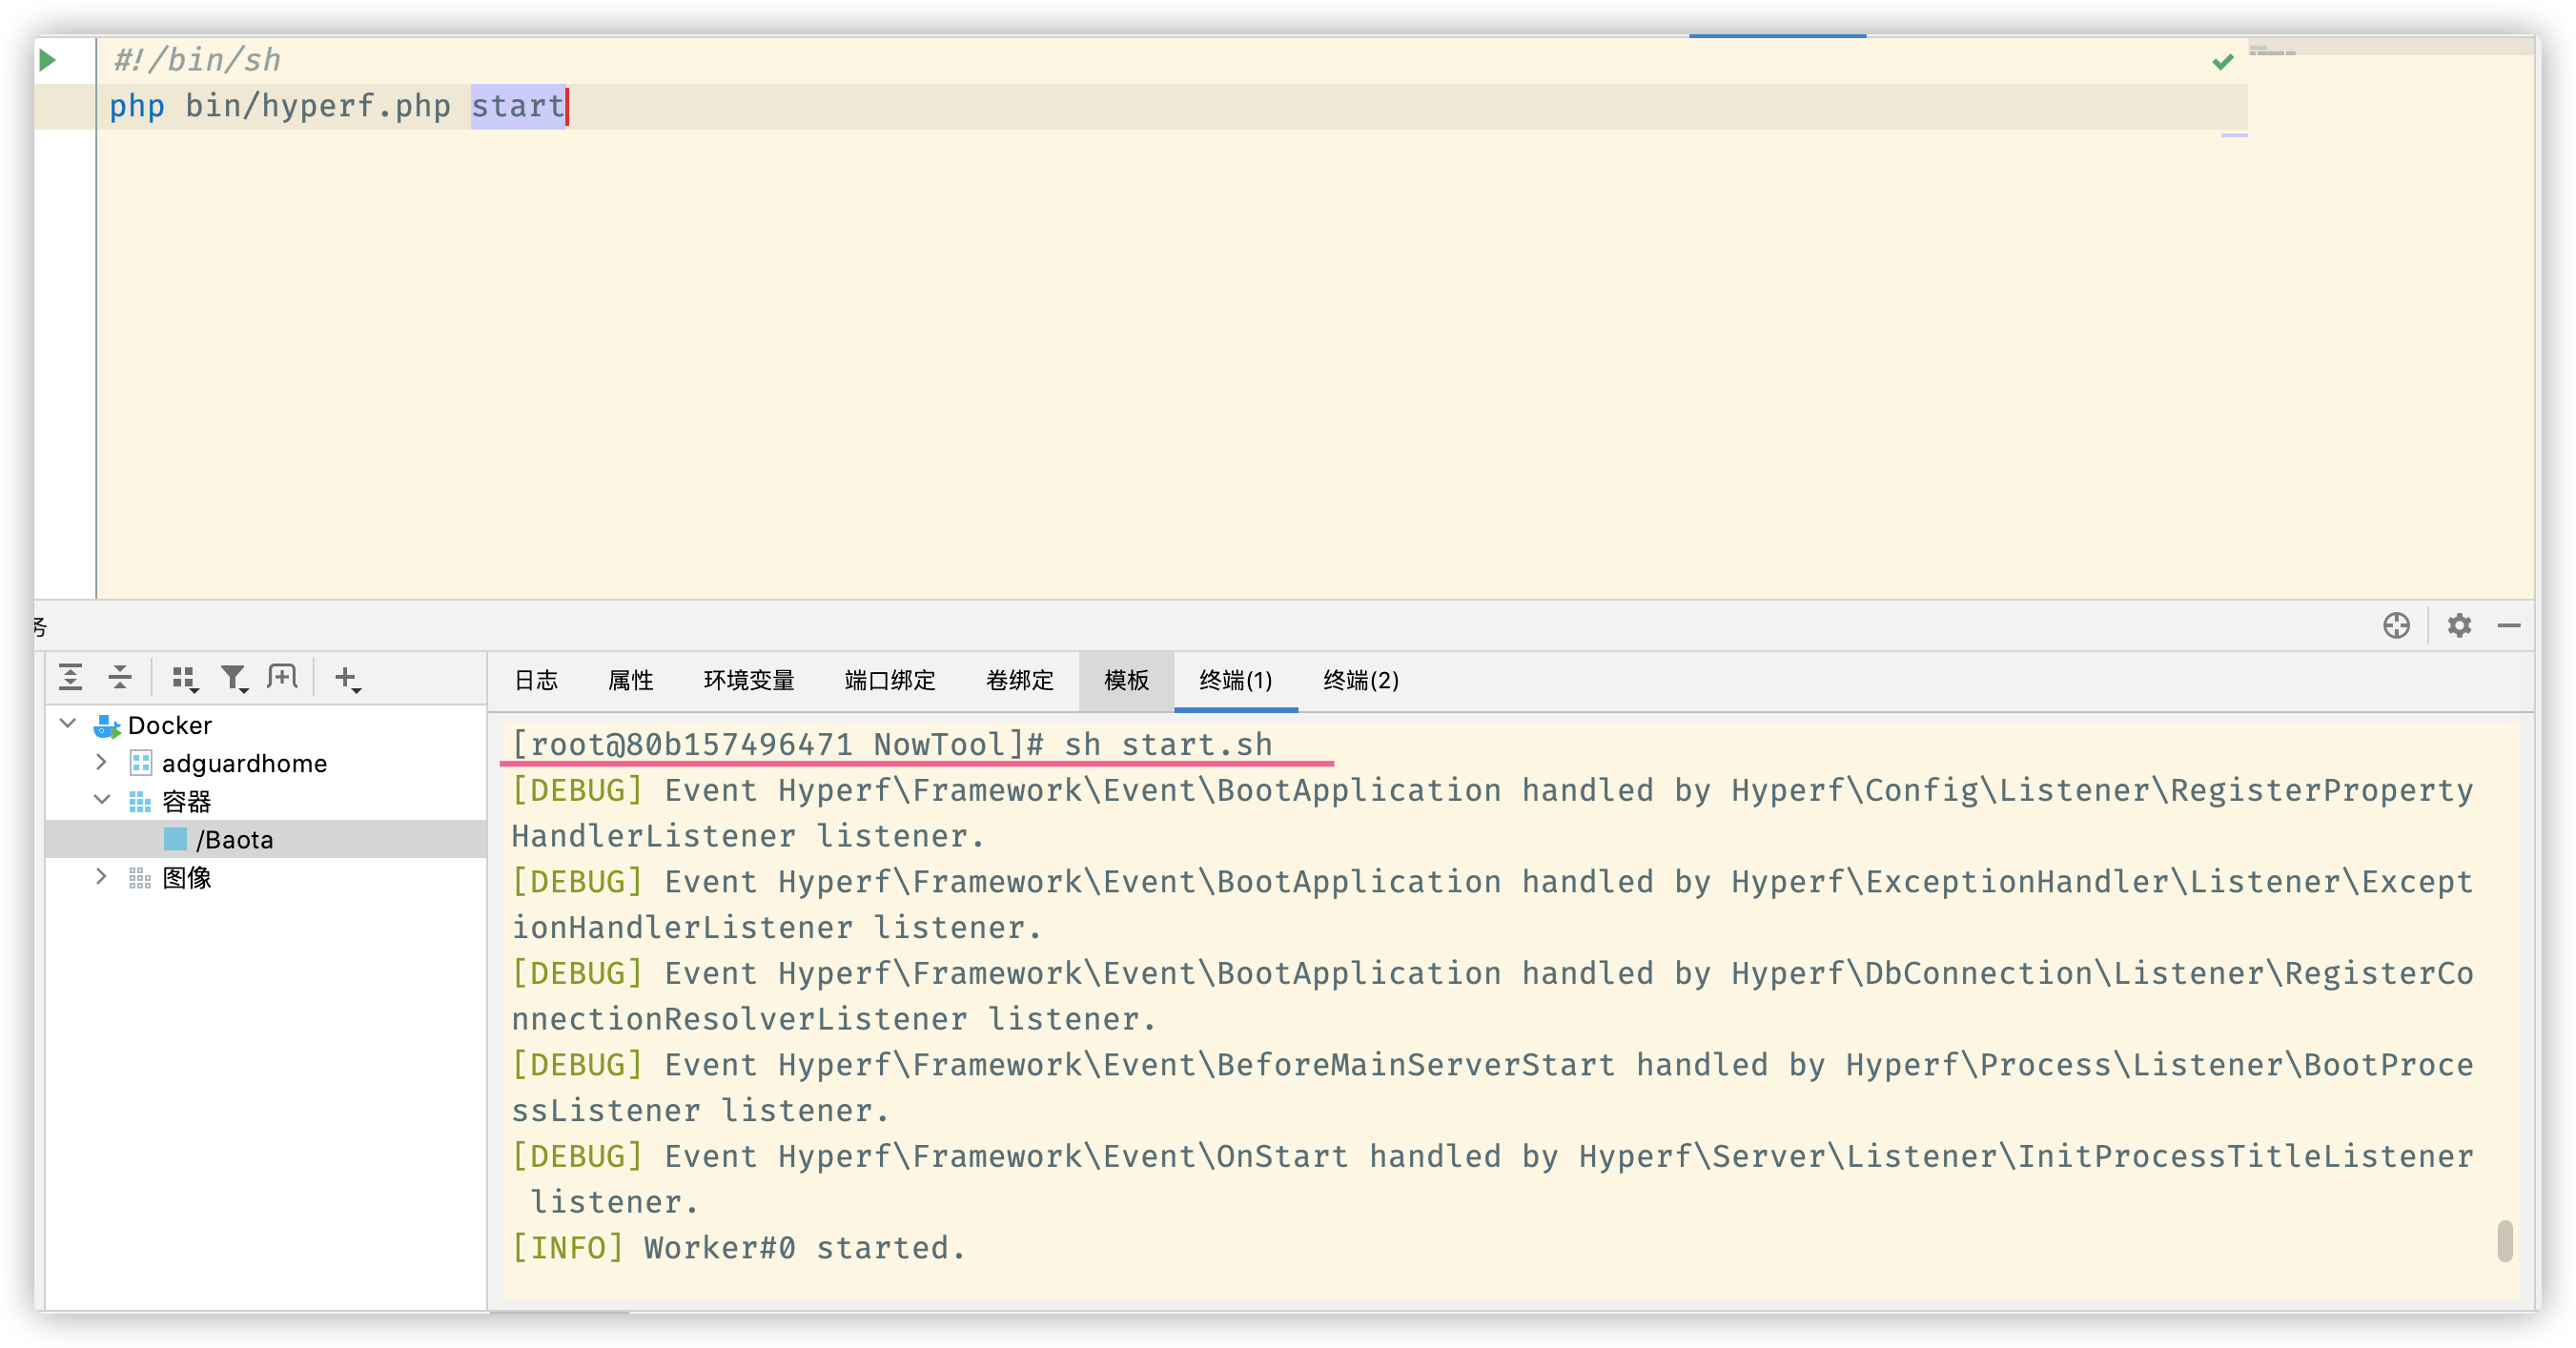
Hyperf 使用 @date、@datetime 注释启动都报错 作者: Shine 时间: 2021-07-03 分类: PHP 评论 Hyperf 使用 @date、@datetime 注释启动都报错 ### 使用 @date 注释 代码如下: ```php <?php declare(strict_types=1); namespace App\Controller\V1\Video; use App\Controller\V1\BaseController; use Hyperf\HttpServer\Contract\RequestInterface; use Hyperf\HttpServer\Contract\ResponseInterface; class DouyinController extends BaseController { /** * @param \Hyperf\HttpServer\Contract\RequestInterface $request * @param \Hyperf\HttpServer\Contract\ResponseInterface $response * * @return \Psr\Http\Message\ResponseInterface * * @author : Chuwen <wenzhouchan@gmail.com> * @date: 2021/7/3 12:28 */ public function index(RequestInterface $request, ResponseInterface $response): \Psr\Http\Message\ResponseInterface { return $response->raw($this->help()); } } ``` 报错: ```log #4 /www/wwwroot/NowTool/vendor/hyperf/d in /www/wwwroot/NowTool/vendor/doctrine/annotations/lib/Doctrine/Common/Annotations/AnnotationException.php on line 39 Fatal error: Uncaught Doctrine\Common\Annotations\AnnotationException: [Semantical Error] The annotation "@date" in method App\Controller\V1\Video\DouyinController::index() was never imported. Did you maybe forget to add a "use" statement for this annotation? in /www/wwwroot/NowTool/vendor/doctrine/annotations/lib/Doctrine/Common/Annotations/AnnotationException.php:39 Stack trace: ``` ### 使用 @datetime 注释 又报以下错误: ```log Fatal error: Uncaught Doctrine\Common\Annotations\AnnotationException: [Semantical Error] The class "datetime" is not annotated with @Annotation. Are you sure this class can be used as annotation? If so, then you need to add @Annotation to the _class_ doc comment of "datetime". If it is indeed no annotation, then you need to add @IgnoreAnnotation("datetime") to the _class_ doc comment of method App\Controller\V1\Video\DouyinController::index(). in /www/wwwroot/NowTool/vendor/doctrine/annotations/lib/Doctrine/Common/Annotations/AnnotationException.php:39 Stack trace: ``` > The class "datetime" is not annotated with @Annotation. Are you sure this class can be used as annotation? If so, then you need to add @Annotation to the _class_ doc comment of "datetime". ### 看到以上错误大概需要怎么做了 参照文档的“注解”部分:https://hyperf.wiki/2.1/#/zh-cn/annotation 解决办法就是,添加需要忽略“注解”,配置文件位置 `/config/autoload/annotations.php`: 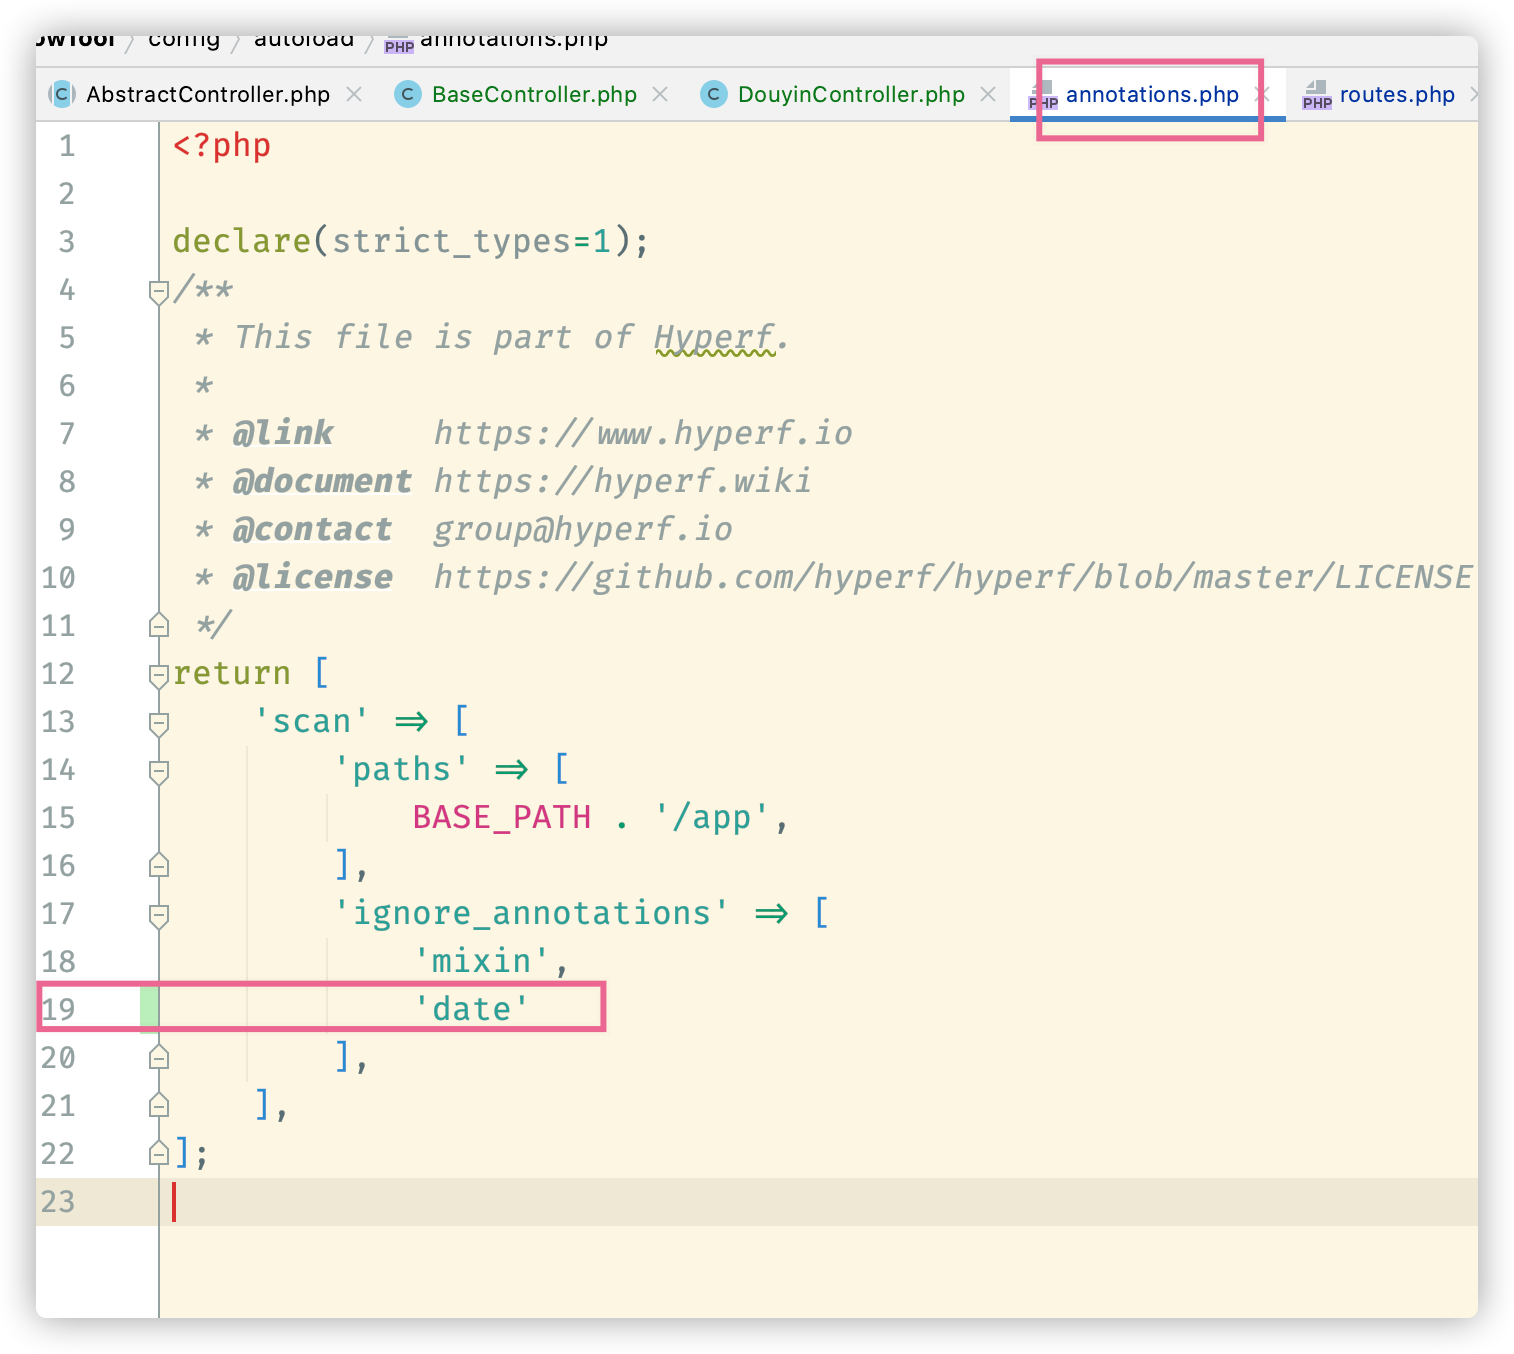 然后就可以正常启动了